- Minecraft Dungeons Eye of Ender Locations Guide
- Creeper Woods
- Soggy Swamp
- Pumpkin Pastures
- Cacti Canyon
- Desert Temple
- Highblock Halls
- Как открыть секретную локацию в Minecraft Dungeons
- Лес Криперов
- Мокрое болото
- Каньон Кактусов
- Тыквенные пастбища
- Шахты красного камня
- Пустынный храм
- Огненная кузница
- Залы Высокоблочья
- Обсидиановая вершина
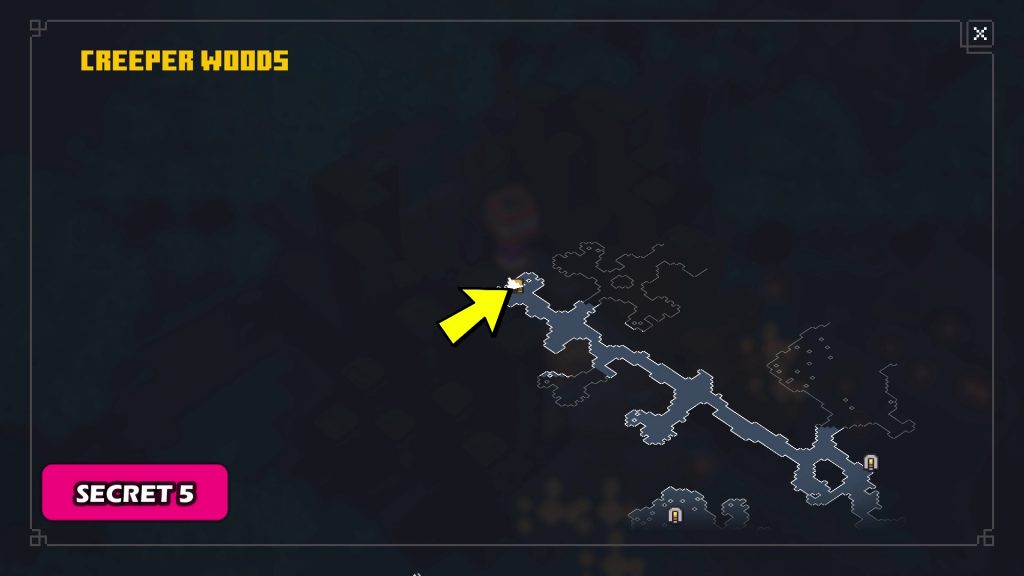
- Minecraft Dungeons: Creeper Woods: All Secrets Locations
- Secret 1
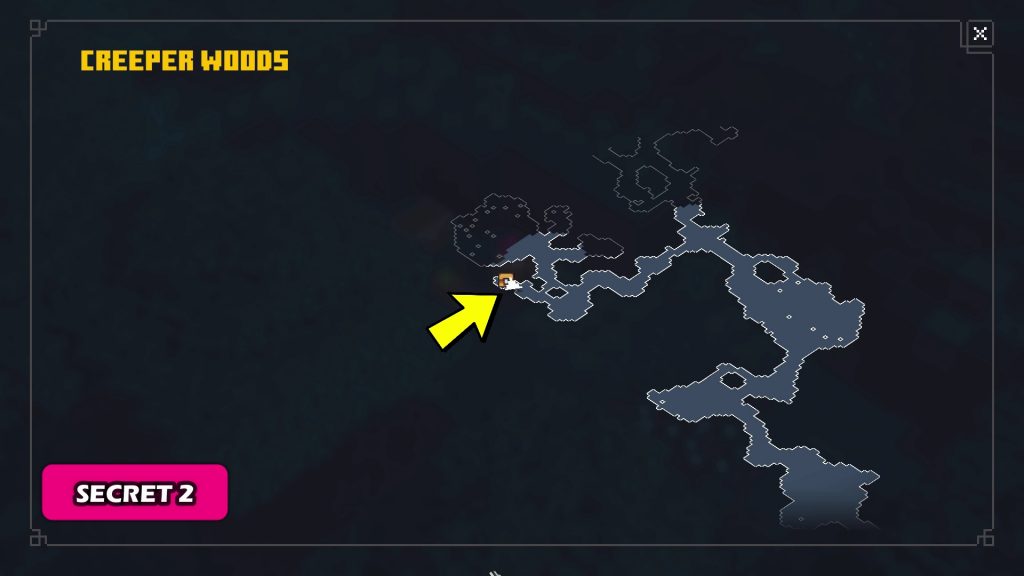
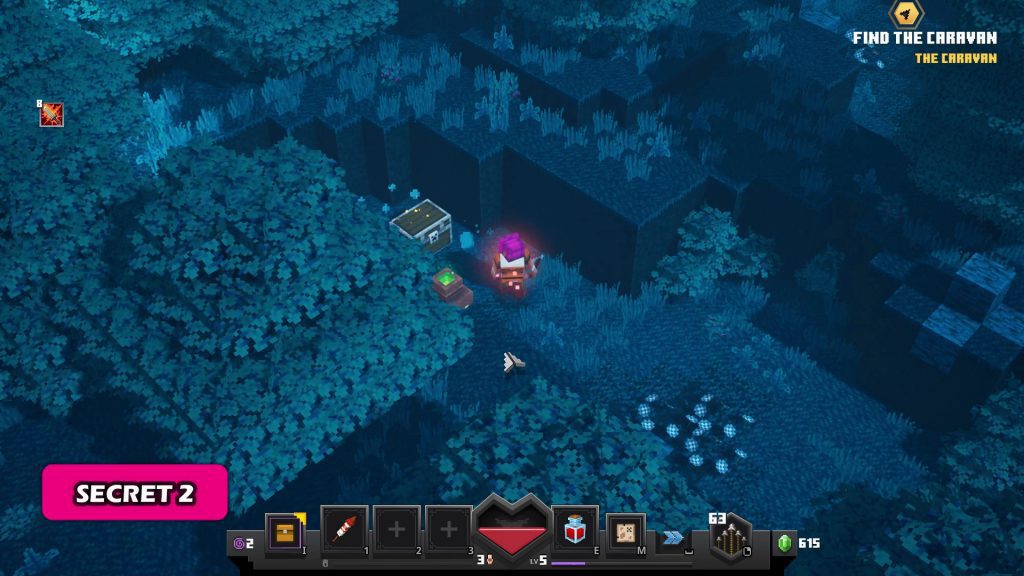
- Secret 2
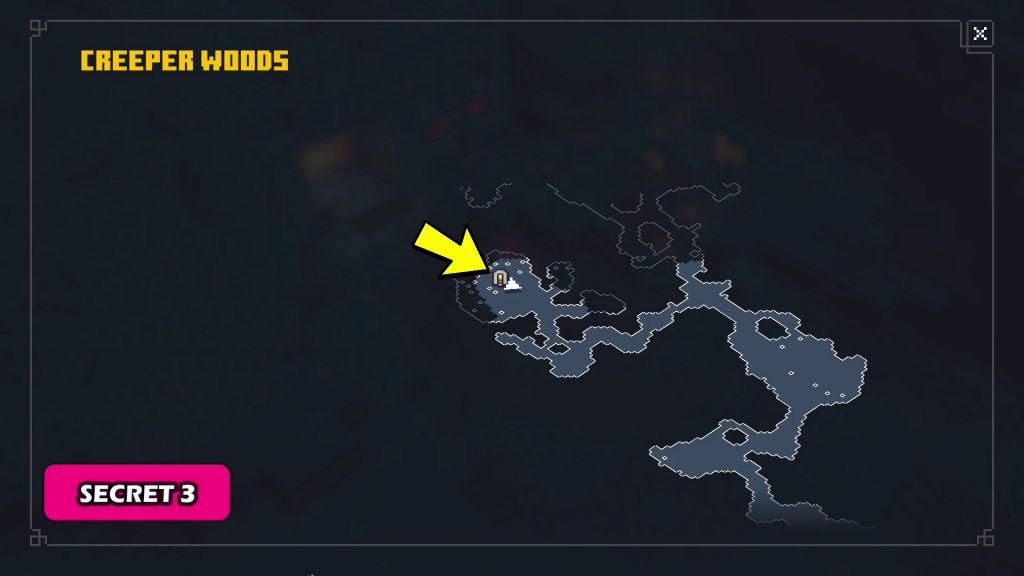
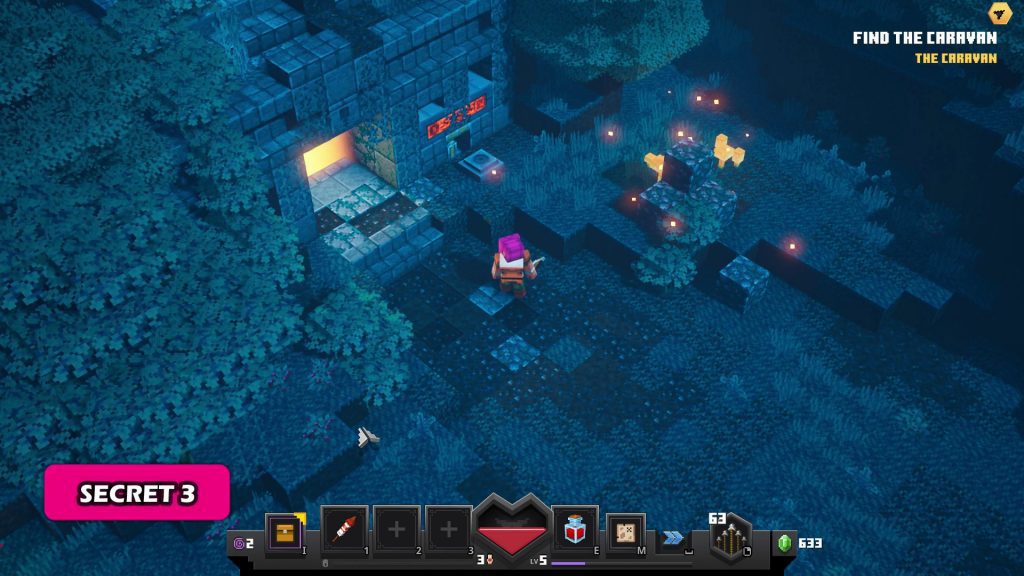
- Secret 3
- Secret 4,5,6,7.
- Secret 8 (Can be collected only after completion of Main Campaign)
Minecraft Dungeons Eye of Ender Locations Guide

Being able to progress in the Echoing Void DLC expansion can definitely be tricky so allow me to help you find all 6 Eyes of Ender.
│ Just like with PlayStation 5, Video Chums utilizes an SSD on our server to deliver lightning-fast page load times. ⚡

Before we begin, allow me to give a quick overview of what to expect. Basically, in order to access the new levels within Echoing Void, you need to collect 6 Eyes of Ender then return them to a new level known as The Stronghold. These key items are located in new areas within 6 of the core campaign’s levels so let’s get to the walkthrough where I’ll tell you exactly where they’re located. v1d30chumz 95-143-191-155
Creeper Woods
To find the first Eye of Ender area, enter Creeper Woods and keep going northeast after the bridge at the beginning of the level. You’ll reach a big rock cube in the water so head up the rock stairs to the right of it, roll off the top to land on a new path, and keep heading along. You’ll fight an Enderman and after you win battle, enter the cave, keep carefully rolling to land on each new platform, and at the end; you’ll face an Endersent boss and the Eye of Ender will materialize once the fight is over. After collecting it and opening any nearby chests, feel free to exit via the Return to Camp option in the pause menu as your progress will actually save.

Soggy Swamp
The second Eye of Ender is found in Soggy Swamp. When you reach the Destroy the Brews mission, run to the southeast part of the area and exit via the newly-formed bridge in the bottom-right; making sure to roll over the gap. Enter the cave at the end, be patient with the moving platforms so you don’t fall down, and you’ll reach some buttons that you push in this order: bottom-left, right, left, bottom, and top. This will allow you to descend to the Endersent boss fight where you can collect your next Eye of Ender.

Pumpkin Pastures
Next, this third Eye of Ender is found in the autumnal Pumpkin Pastures. Keep following your objective arrow until you reach the area that’s pictured in the screenshot below (it has a center patch that’s surrounded by a fence) then run southwest from there until you fight enemies in an arena. Once you win, enter the doorway to the left to encounter a bunch of Raid Captain mini-bosses. You don’t have to defeat them so run northeast then southeast after the gate closes and a couple of Endermans should show up. Defeat them then activate a button at the very top of this area after entering a stone passageway. This will allow you to exit via a doorway after climbing the southeast stone stairs. Then, fight the Endersent for its respective Eye of Ender. Phew; that was a long one!

Cacti Canyon
For the fourth Eye of Ender, follow along while playing through Cacti Canyon just like we did with Pumpkin Pastures and when you reach the intersection that’s depicted in the screenshot below, head southwest through an archway and keep running southwest until you see a cave then enter it. In here, enter another door, be careful of the wall segments that close in on you, fight the arena enemies, and grab the key after the battle. Make sure it stays attached to you and use it in the previous room. Enter the newly-accessible room, fight more enemies in the southwest, grab another key, use it in this area, and enter another door. Snag the yellow key here, haul it all the way back to the first room, use it in the northeast, and battle the Endersent for a much-deserved Eye of Ender. 😅

Desert Temple
Thankfully, Desert Temple is fairly straightforward although getting the fifth Eye of Ender here is slightly tricky. As always, follow the mission arrow and as you do so, open the gold key door, run past the Redstone Golem, complete the arena battle, and exit northwest when you reach the junction in the screenshot below. Enter the door after pressing the button, you can run past the Endermans if you want, and keep following along while avoiding the dangerous walls and rolling over any gaps. You’ll unlock a door with a blue key and another door by activating switches then finally receive your Eye of Ender after fighting another Endersent. Well, that was tough!

Highblock Halls
Lastly, we’ll obtain the sixth and final Eye of Ender from Highblock Halls. Follow the arrow until you reach the Destroy the Buffet objective which is after a short underground area then exit via a new passageway in the northwest as pictured in the screenshot below. Flip switches to open the gates, enter the door, work your way through, fight an Enderman, take down the last Endersent, and collect the final Eye of Ender. Yay! 😄 Now that we have all 6 Eyes of Ender, go to The Stronghold and return them to unlock The End Wilds.


- Minecraft Dungeons DLC Review (Part 2)
 Samba de Amigo: Party Central Review
- Fae Farm Review
- Rune Factory 3 Special Review
- Taito Milestones 2 Review
- Chrome Wolf Review


- Top 10 Underrated Games I’ve Reviewed (Year 9)
- Top 10 Games We Reviewed in 2022


- Retro-Inspired Indie Games (Part 10)
- Agatha Christie — Hercule Poirot: The London Case Guide


Comments for Minecraft Dungeons Eye of Ender Locations Guide
Источник
Как открыть секретную локацию в Minecraft Dungeons

Оказывается, помимо доступных локаций, которые можно проходить в Minecraft Dungeons на разных уровнях сложности, есть еще и скрытая. Чтобы открыть ее, придется задействовать все свои навыки кладоискателя и найти 9 рун, которые разбросаны по миру игры.
Проход в таинственное место находится на юго-востоке вашего Лагеря. Если пойти в эту сторону, то перед вами появится деревянный мост, который можно опустить. Пройдя по нему, идите прямо. Когда заметите первую тропинку, сверните на юг. Она приведет вас к церкви, в которой будет кнопка, открывающая проход на скрытый уровень. Над кнопкой вы увидите лишь одну светящуюся руну, которую дают по умолчанию. Чтобы зажечь все остальные, их предстоит найти.
Лес Криперов

Вам нужно добраться до последнего задания, в котором потребуется спасти 5 селян от монстров. После того как уничтожите всех врагов, направляйтесь на юго-запад. Когда доберетесь до края области, то увидите груду камней. Один из них окажется кнопкой, на которую нужно нажать. После этого откроется секретный проход, в который вам необходимо зайти. Пройдя по туннелю, вы обнаружите еще одну кнопку, нажимайте ее и забирайте появившийся предмет.
Мокрое болото

Руну можно забрать в самом конце локации. Уничтожив котел, смотрите по сторонам. Вам нужно найти колону из камня, на которой весит лоза, а перед ней растут грибы. Среди грибов будет кнопка, на которую нужно нажать. После этого отроется секретная дверь, туда необходимо зайти и забрать руну.
Каньон Кактусов

Проходите уровень, пока не доберетесь до золотого ключа. Забрав его, не спешите бежать к синему ключу. Вам нужно внимательно изучить все растения, которые растут слева от ворот. Среди листьев вы найдете кнопку, на которую можно нажать. После ее активации вы заметите, что секретный проход к следующей руне откроется сразу за синим ключом.
Тыквенные пастбища

Где-то в середине прохождения локации у вас появится задача – найти деревню. По пути вы наткнетесь на огромную стену замка. Если идти вдоль нее, то можно заметить множество ящиков. Кнопка, которая откроет проход к очередной руне, где-то среди них, так что будьте внимательны. Наверняка вы уже поняли, что все руны спрятаны в секретных комнатах, так что открывать их придется в каждой локации.
Шахты красного камня

После прохождения задания «Освободить 5 жителей» не торопитесь переходить в следующую область. Вам нужно пойти в самый конец помещения и найти красный камень. Сразу за ним будет кнопка, которая поможет забрать следующую руну.
Пустынный храм

После того как заберете золотой ключ, отправляйтесь в соседнюю комнату. Там будет расти пальма, которая закрывает еще одну кнопку своими листьями. Нажимайте на нее и забирайте руну в секретной комнате.
Огненная кузница

Здесь найти руну можно почти в самом начале уровня. После перехода ко второй по счету области, вы увидите павшего Голема. Если обратить внимание на левый задний угол помещения, то там будет рычаг. Взаимодействуем с ним и получаем руну.
Залы Высокоблочья

Нужно добраться до торговой площади. После того как одолеете всех врагов, идите в северную часть помещения. В одном из углов будет переключатель. Активируем его и попадаем в еще одну секретную комнату.
Обсидиановая вершина

Во время погони за Архи-Зловредом вы попадете в огромное помещение. Разобравшись с врагами, не спешите продолжать вашу безумную гонку за боссом. Если исследовать это помещение, то можно попасть в библиотеку. Внутри вам нужно внимательно изучить каждую книжную полку, потому что одна из них открывает проход в секретную комнату. Чтобы проход открылся, достаточно будет потянуть на себя одну из книг. К слову, помимо руны в этой комнате будет еще несколько сундуков с лутом.
После того как собрали все руны, возвращайтесь в церковь в Лагере. Теперь на кнопку, которая находится внутри, можно нажать. Откроется помещение с сундуками и картой, где отмечена секретная локация. Используя карту, вы сможете пройти таинственную миссию, которую так тщательно пытались скрыть разработчики.
Поверьте, в этом месте вам понравится! Чтобы не спойлерить, лишь скажу, что локация является отсылкой к одной очень известной игре. Там еще несколько персонажей на выбор, море крови и последний босс Дьявол. Удачи с поиском рун!
Источник
Minecraft Dungeons: Creeper Woods: All Secrets Locations
The map is procedurally generated. Map layout, Number of Secrets and Secrets Locations will vary for each playthrough. In Creeper woods, number of secrets will vary from 2 to 10. One Secret will always be taken by default as the mission is launches. Two of the secrets have fixed location. Location for rest of the secrets varies. One Secret Rune can be collected only after you have completed the entire main campaign. So, in your first playthrough you wont be able to collect all the secrets. Check the video at the end of the page if the written walkthrough is not clear.
Secret 1
You’ll get it by default as the mission is launched.
Secret 2
This secret has a fixed location. Check the picture below.
Secret 3
This secret is an entrance to a crypt and has a fixed location. Check the picture below.
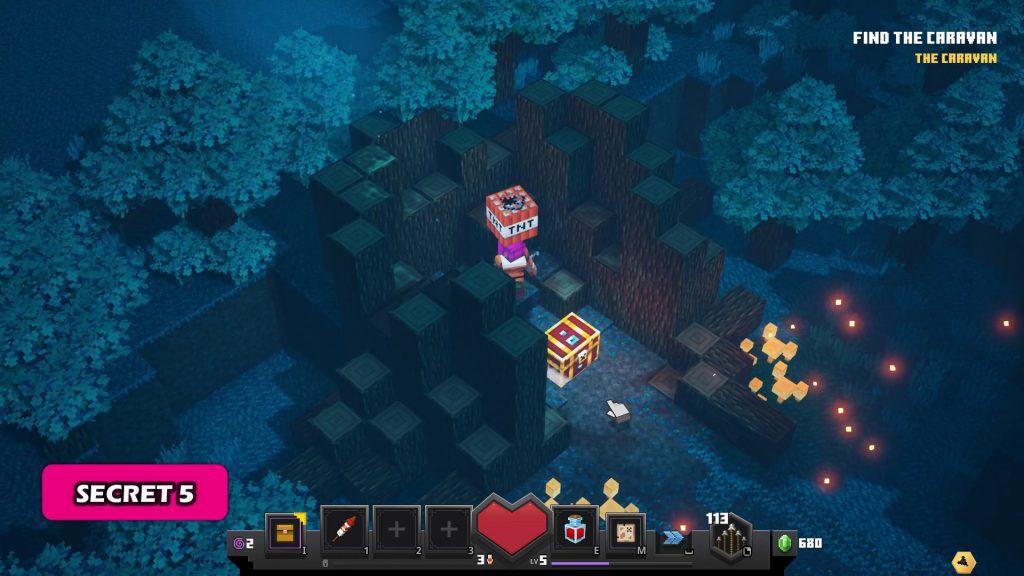
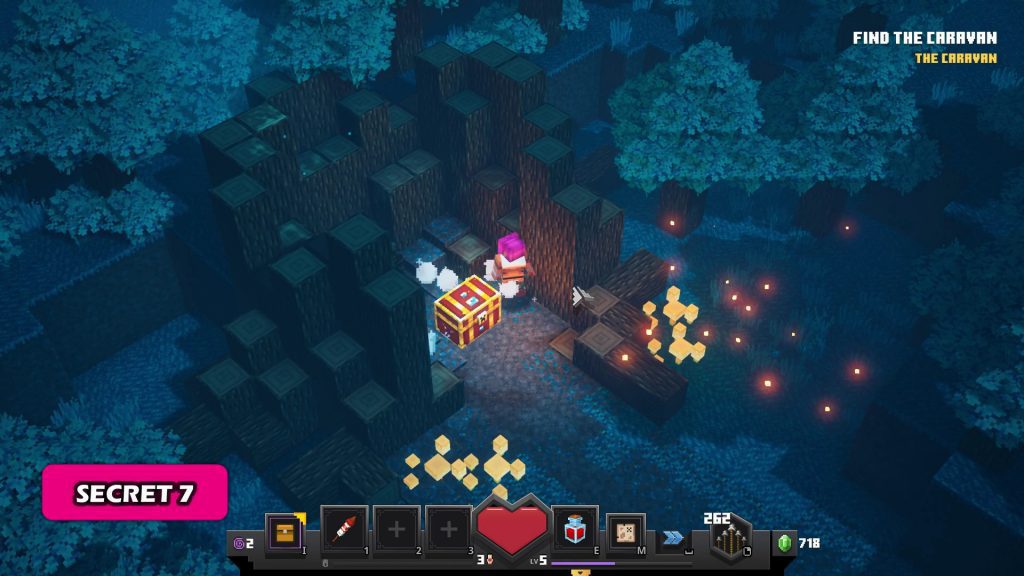
Secret 4,5,6,7.
Next few secrets will have varying location on map. These secrets will always be found in portions extending into the walls. A Couple of examples are shown below.

Secret 8 (Can be collected only after completion of Main Campaign)
This secret is in the area where you get the objective to free 5 villagers. In this area there is a movable rock and just next to it you’ll find a pressure plate that will move the rocks. Press the plate as shown in picture 2 below and it will open a secret passage. Go inside and collect a Secret Rune. Collecting 9 Runes will unlock a Secret Cow Mission.
Источник