Royal Romances Episode 9: The Dragon Legacy – Walkthrough
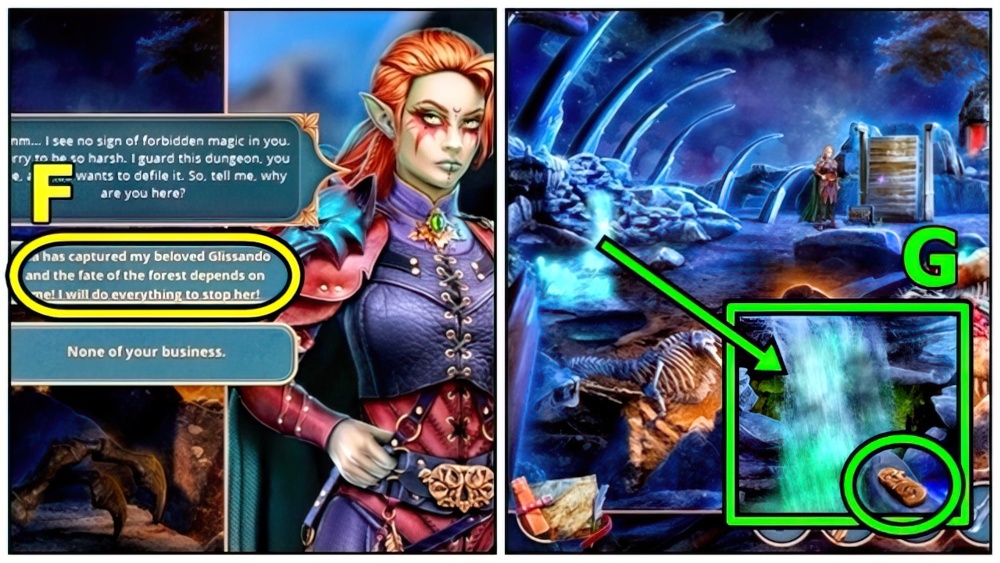
Royal Romances Episode 9: The Dragon Legacy – The walkthrough of the game begins with the fact that you meet a woman who read a prophecy about the return of dragons. Ida wants to perform a ritual to find out if Glissando is the chosen one. The magic required to do so is forbidden and dangerous. You must stop this witch as soon as possible and find out where she went. If you are stuck and do not know how to get through one of the locations, on our website you can watch the walkthrough of the game Royal Romances 9: The Dragon Legacy, and win.
Royal Romances Episode 9: The Dragon Legacy – Walkthrough
Here you can watch the full walkthrough of the game Royal Romances Episode 9: The Dragon Legacy, namely the main plot.
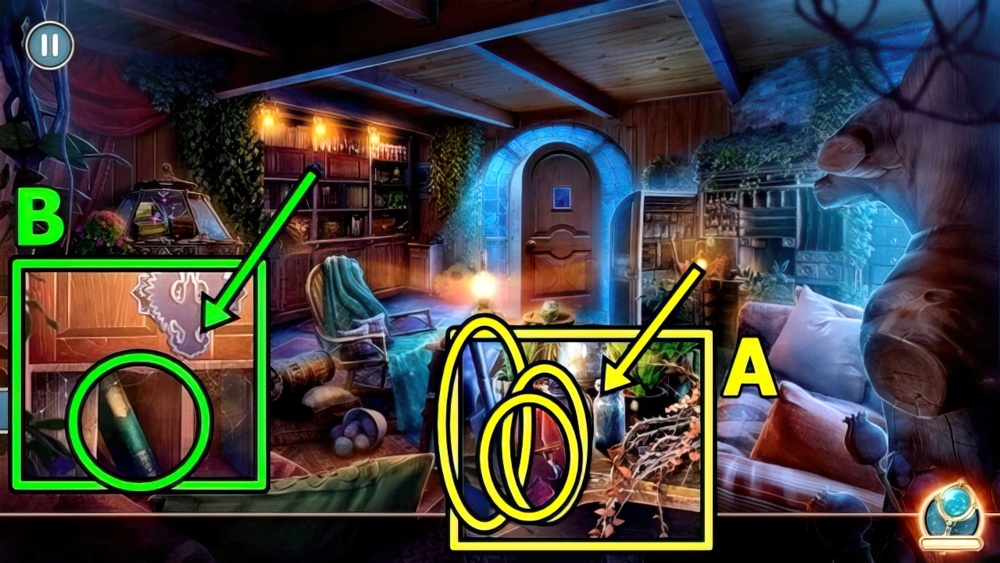
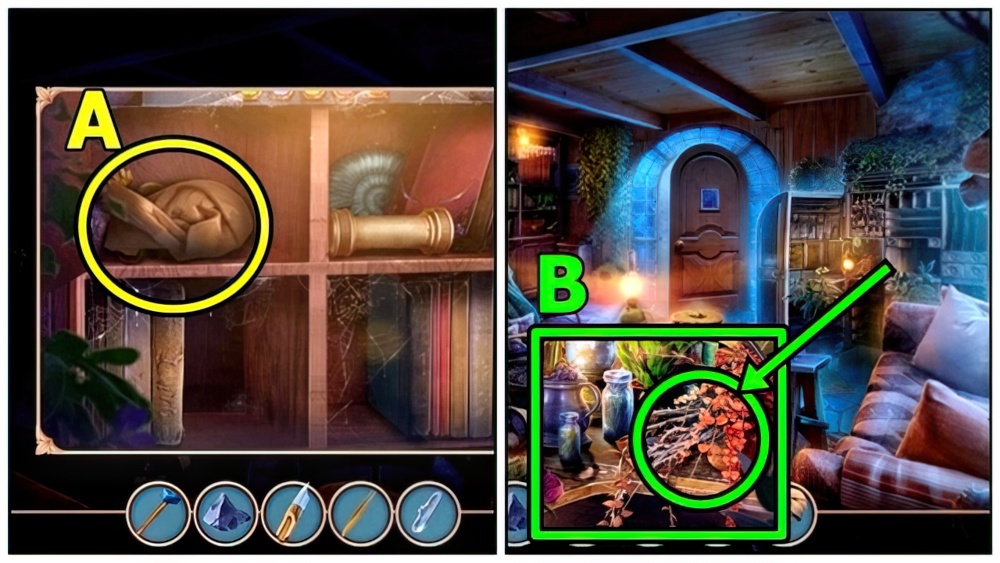
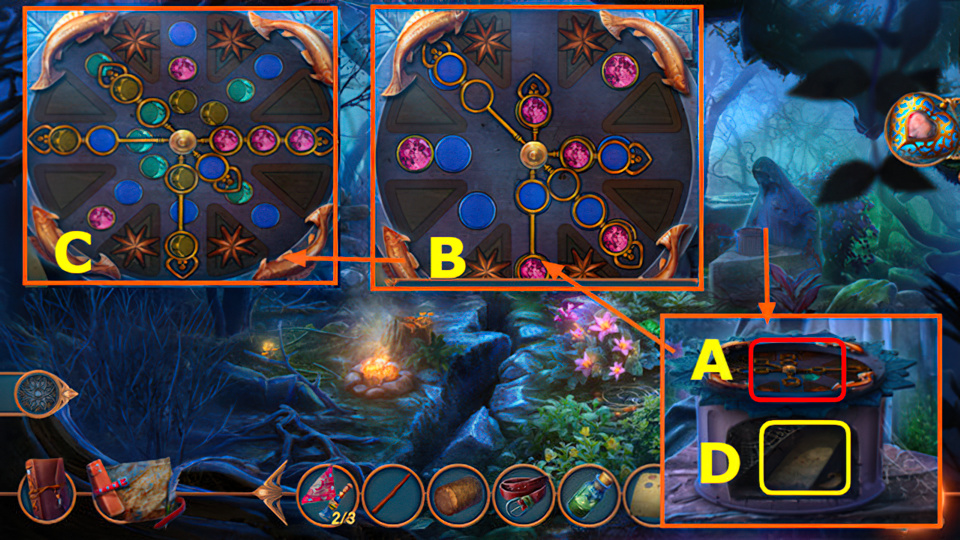
- Take Task Journal (A), WATER BOTTLE and SHOVEL.
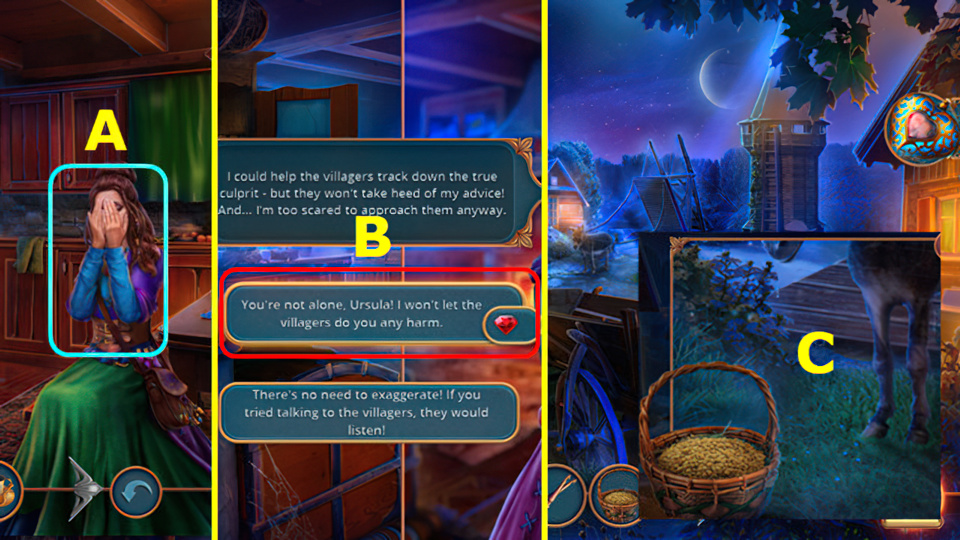
- Read (B), take RECORD.
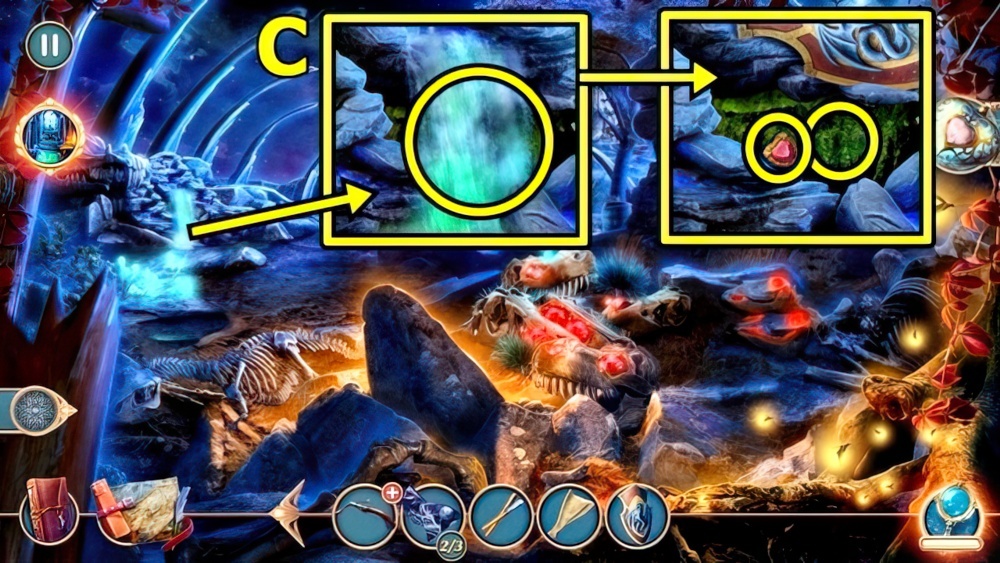
- Add RECORD (C), take PLIERS PART, EAGLE AMULET 1/2 and BRUSH.
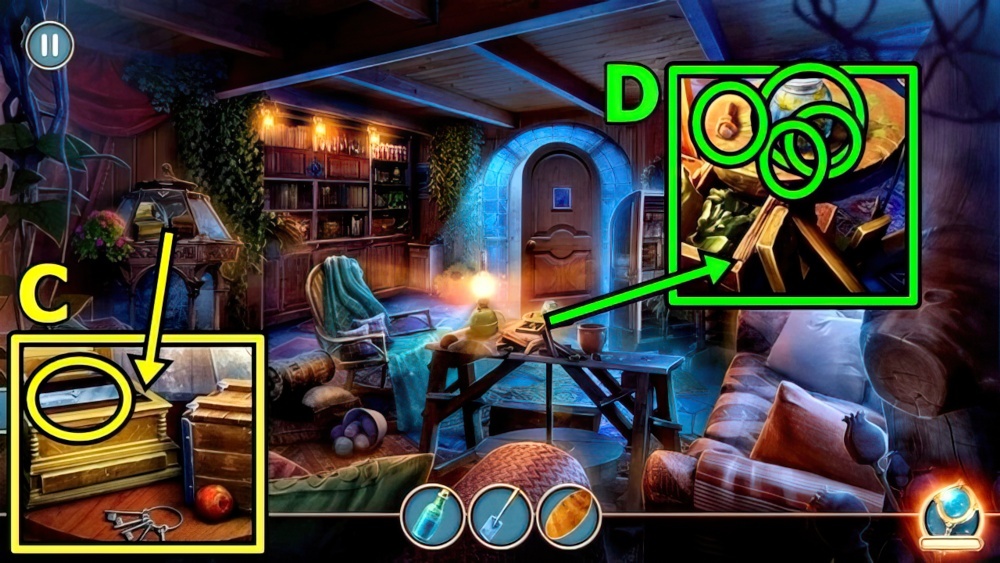
- Take BOLT (D). Add WATER BOTTLE and BRUSH, take JAR.
- Move forward.
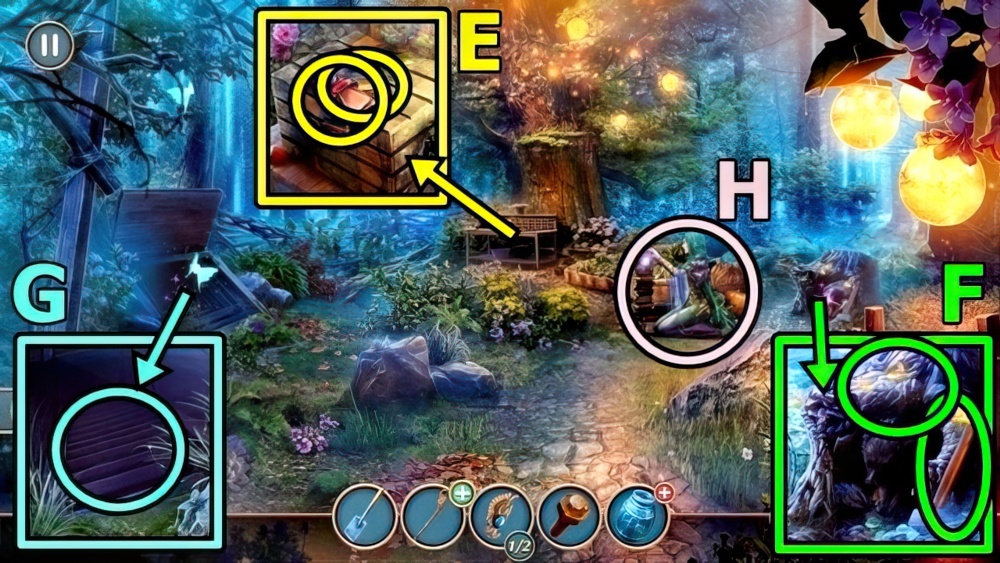
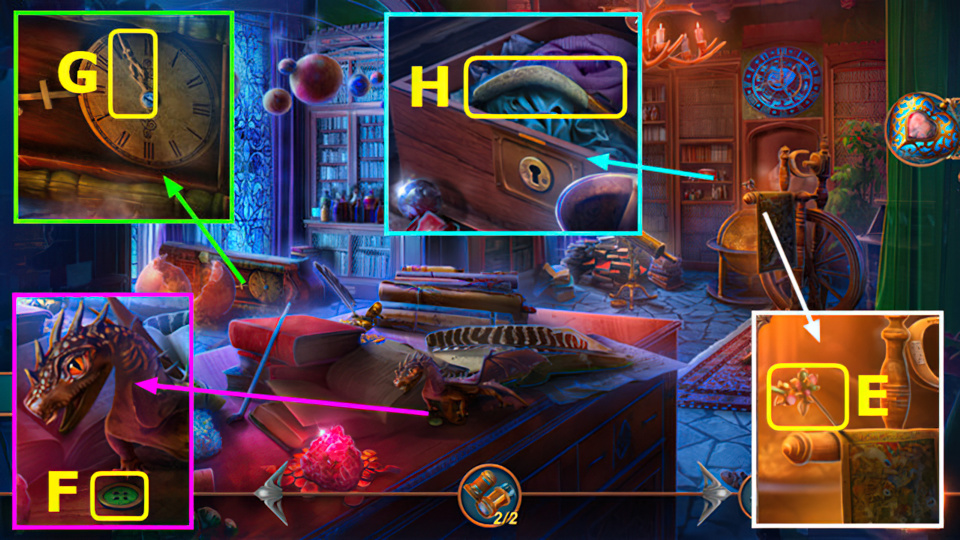
- Take Map (E) and LID.
- LID on JAR, receive LIDDED JAR.
- Use LIDDED JAR (F), receive FIREFLY JAR. Take HAMMER.
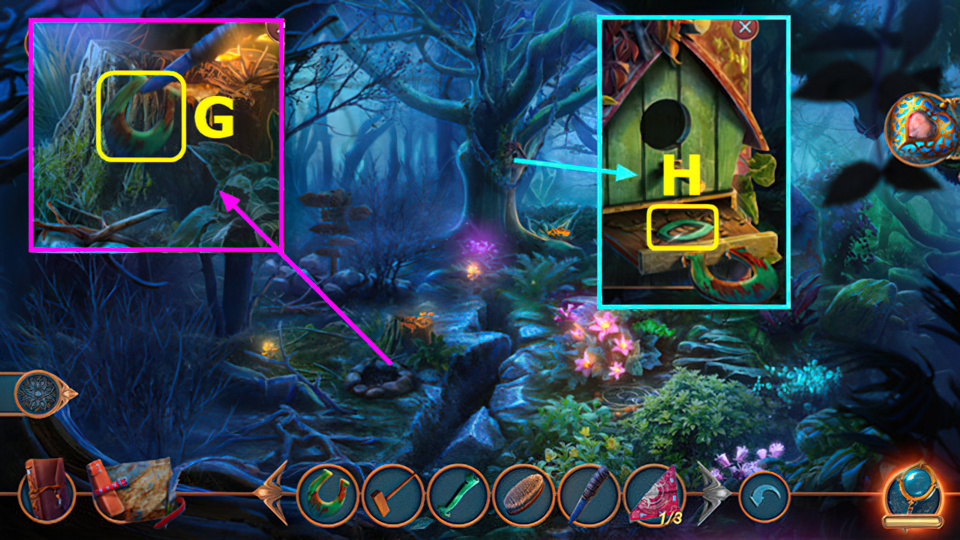
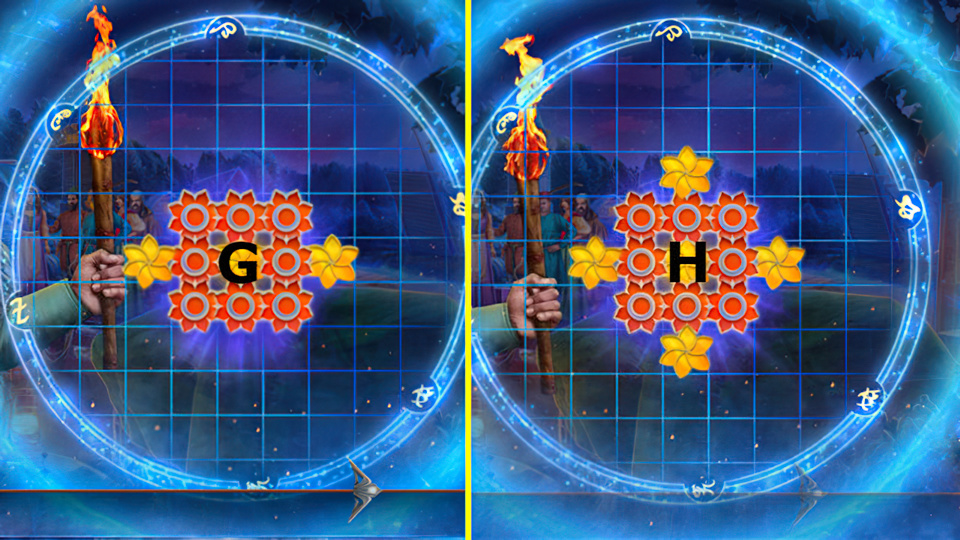
- Use FIREFLY JAR (G). Play puzzle, take DRAGON SCROLLS.
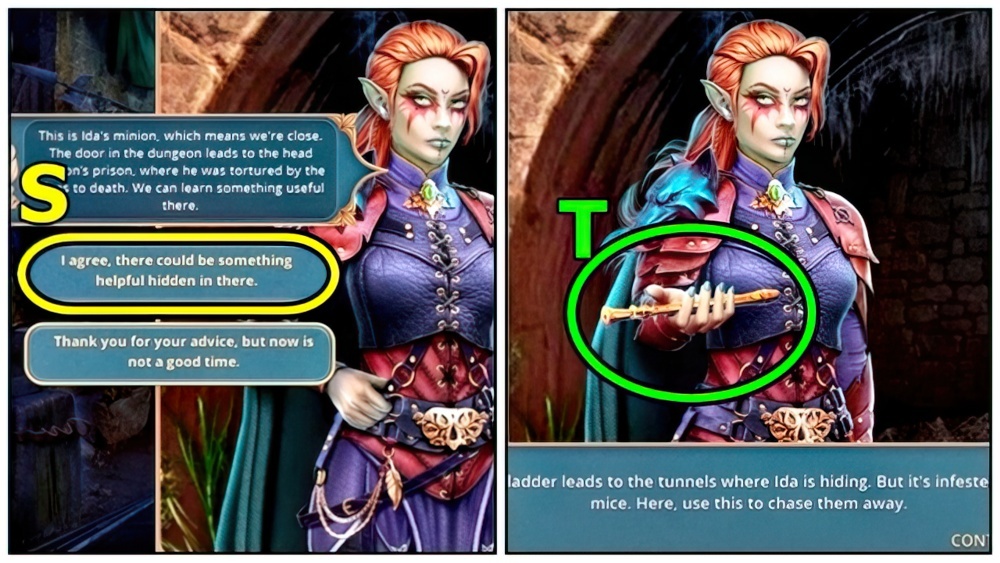
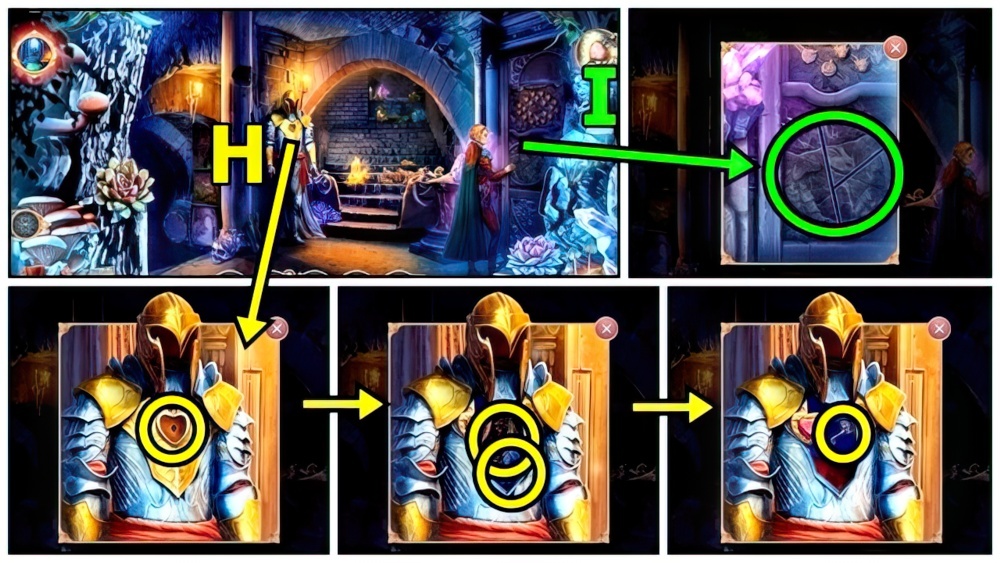
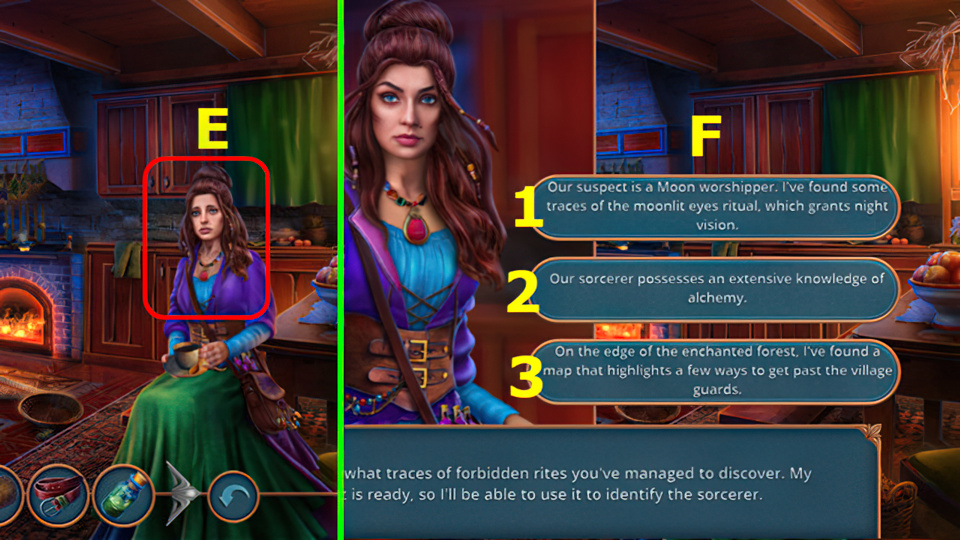
- Offer DRAGON SCROLLS (H).
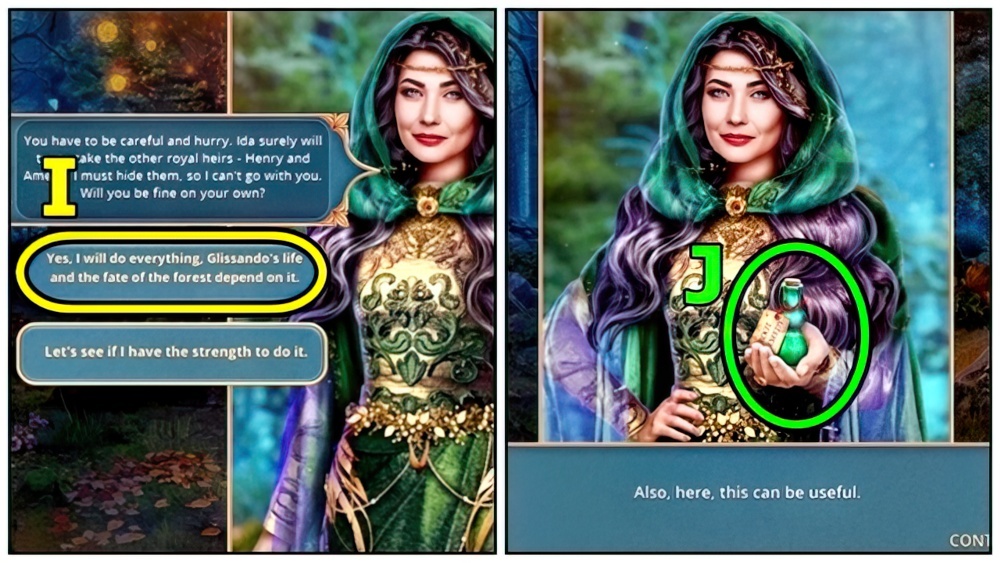
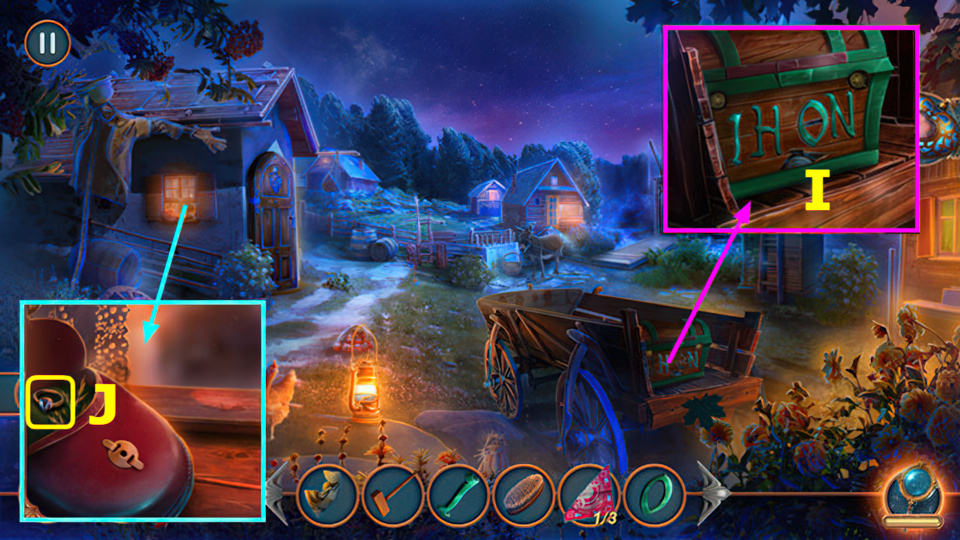
- Answer (I).
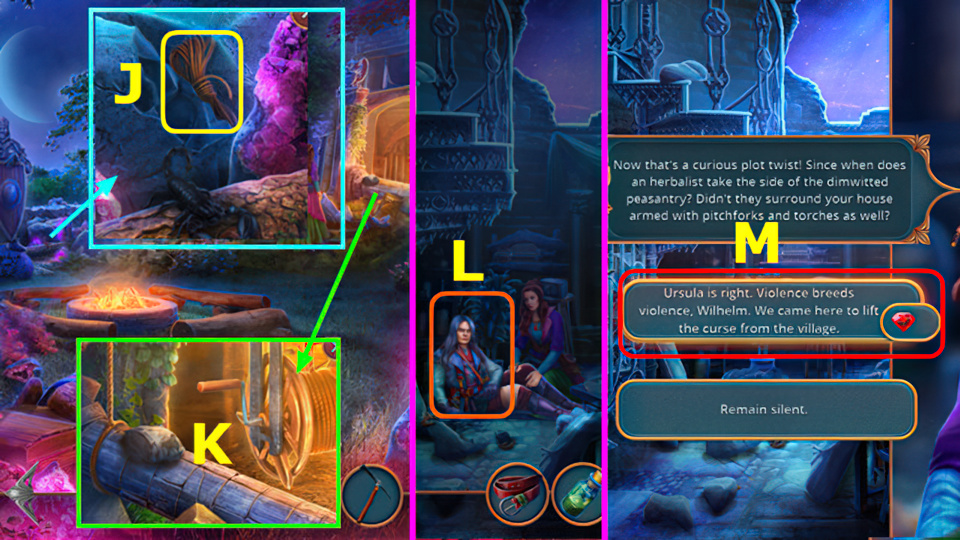
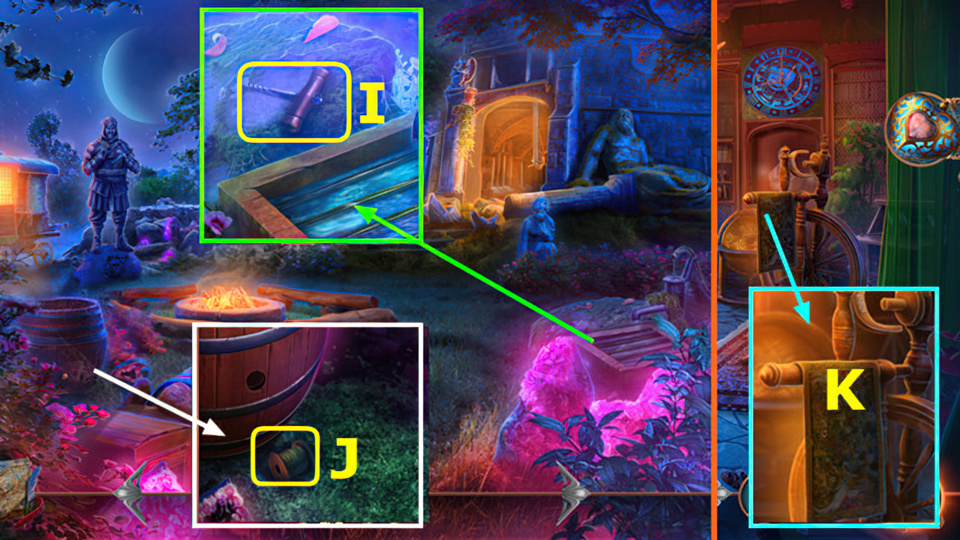
- Take ROOT REMEDY (J).
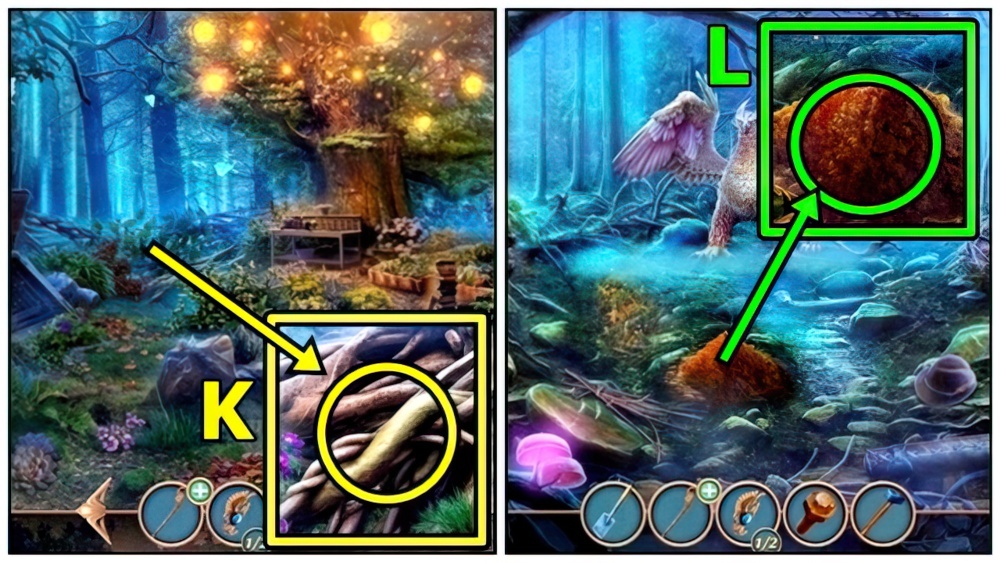
- Pour ROOT REMEDY (K).
- Move forward.
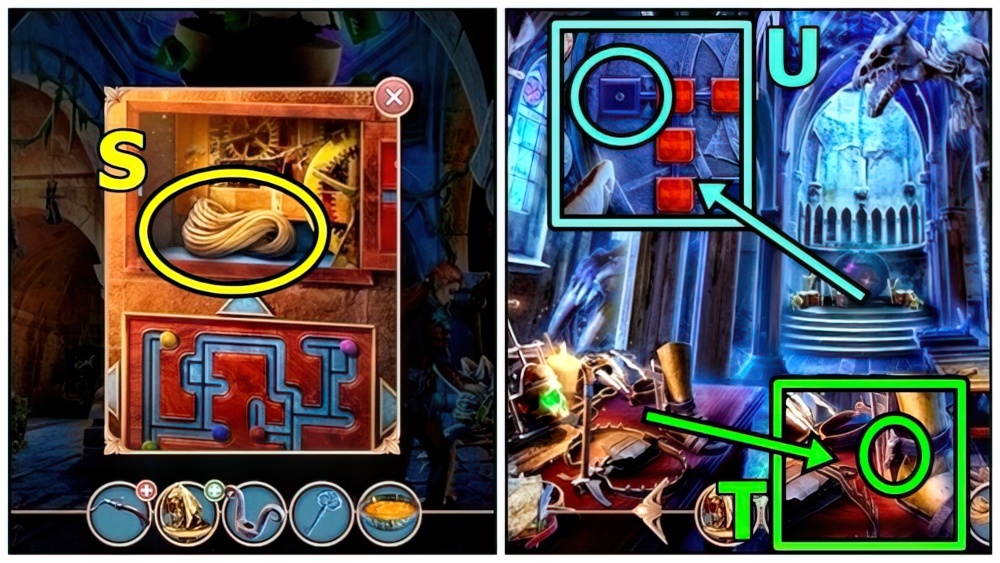
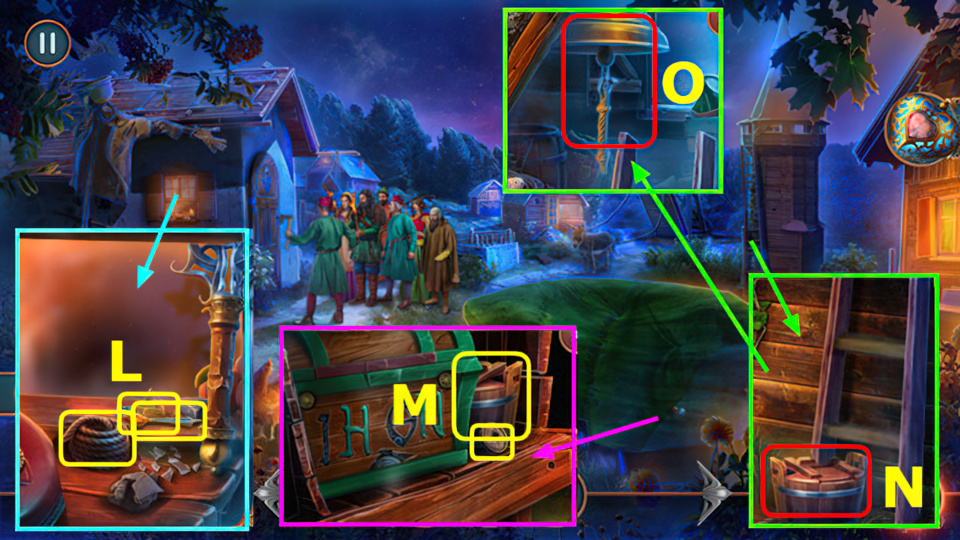
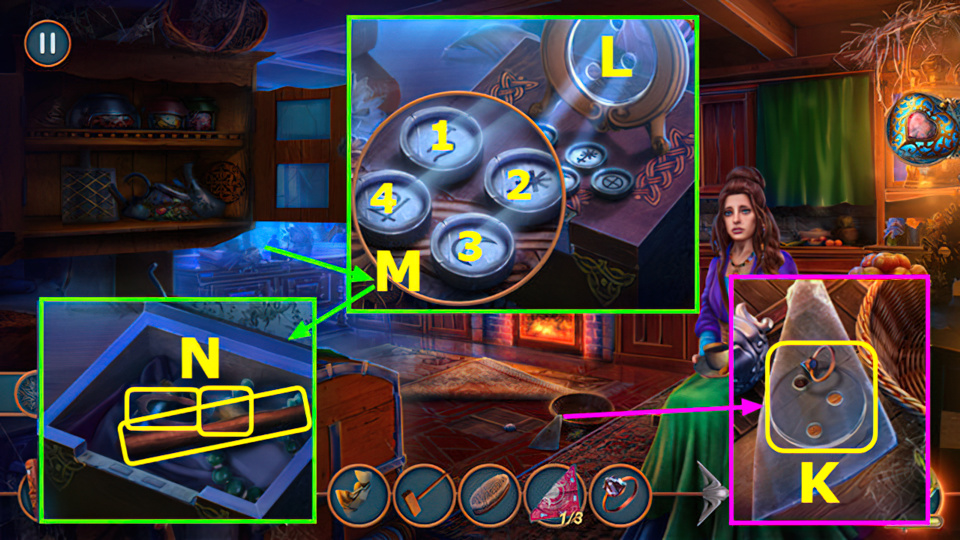
- Use SHOVEL (L), take TWEEZERS and OTHER PLIERS PART.
- Return to Nerida’s Shack.
- BOLT and OTHER PLIERS PART on PLIERS PART, receive PLIERS.
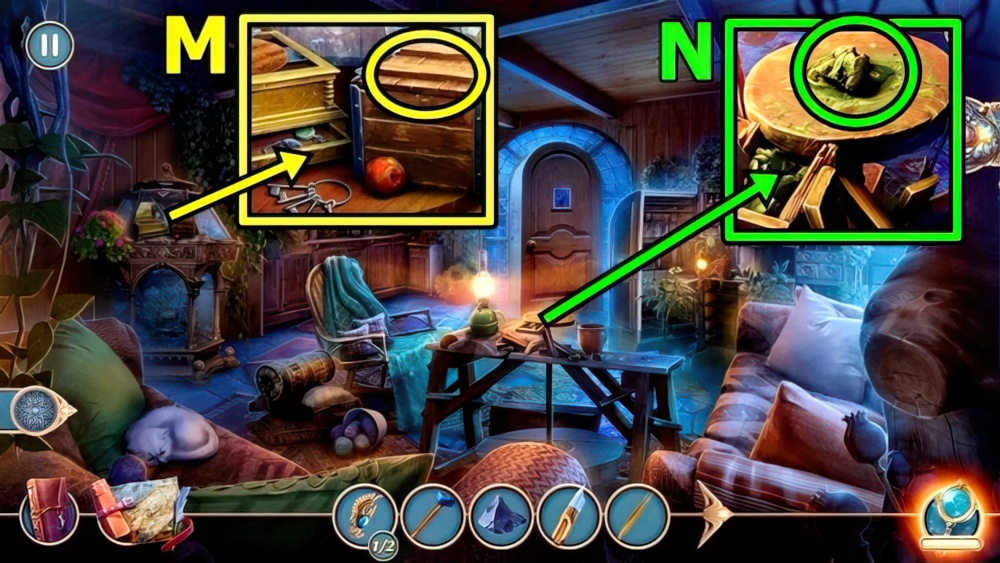
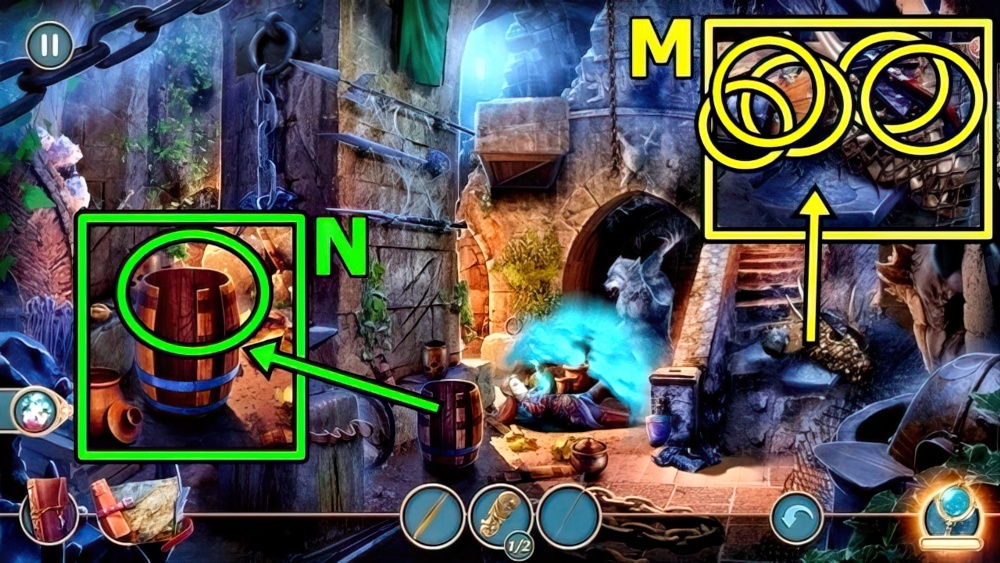
- Use PLIERS (M), take CLAY COOKWARE SHARDS.
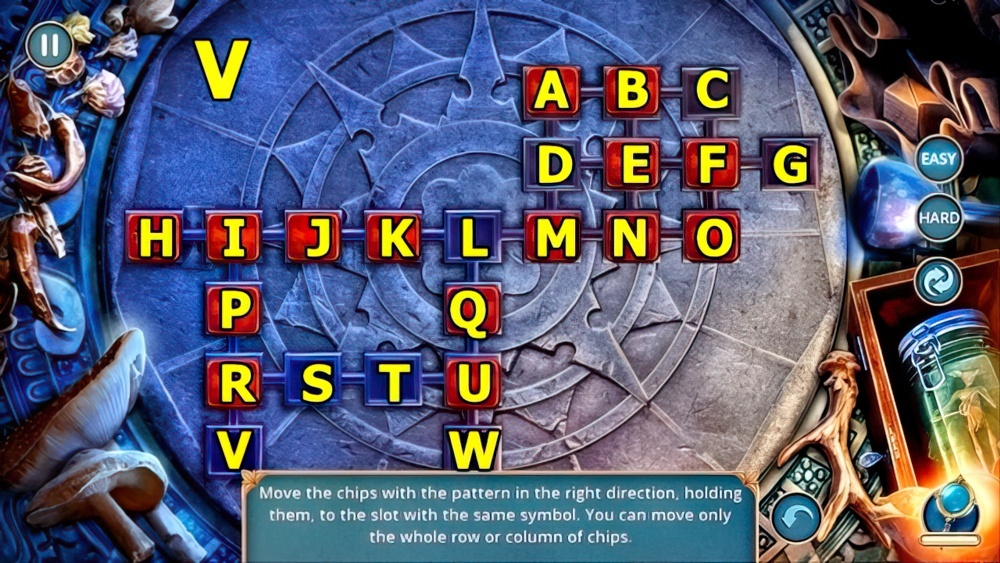
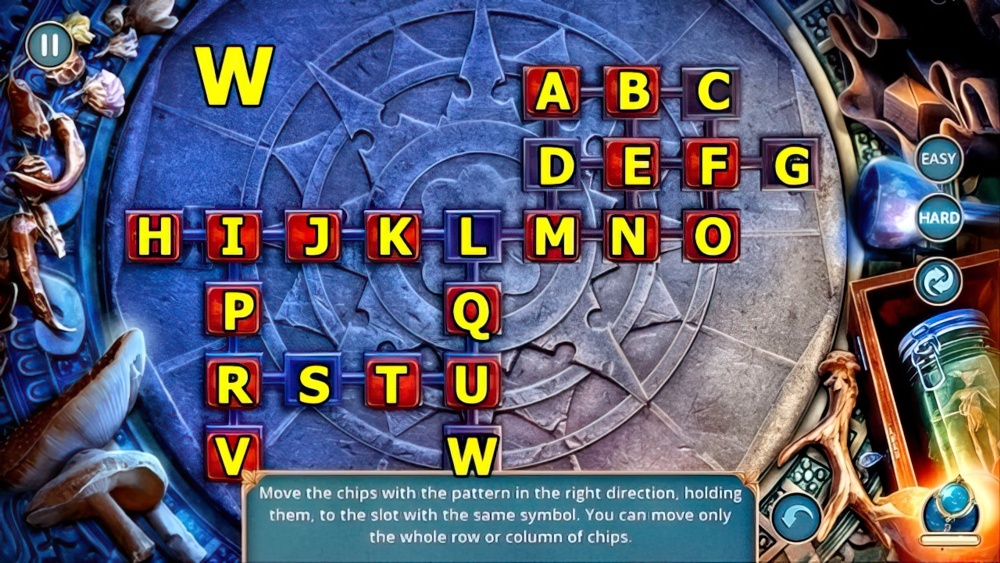
- Add CLAY COOKWARE SHARDS (N).
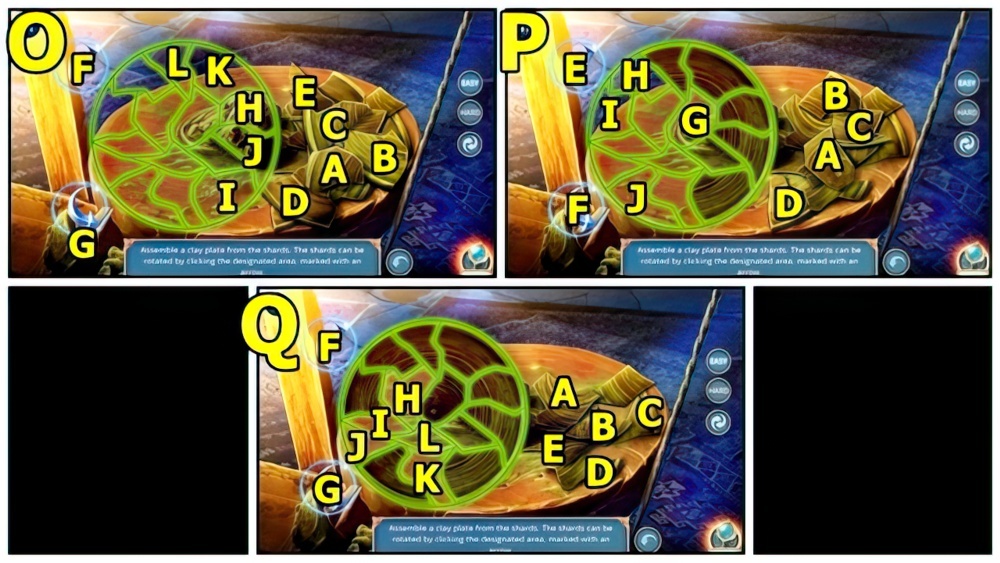
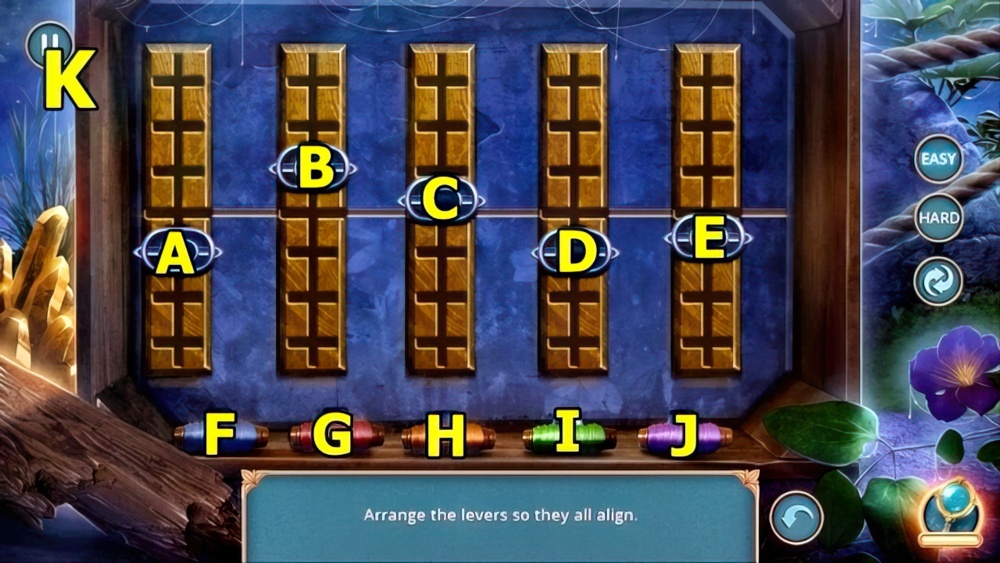
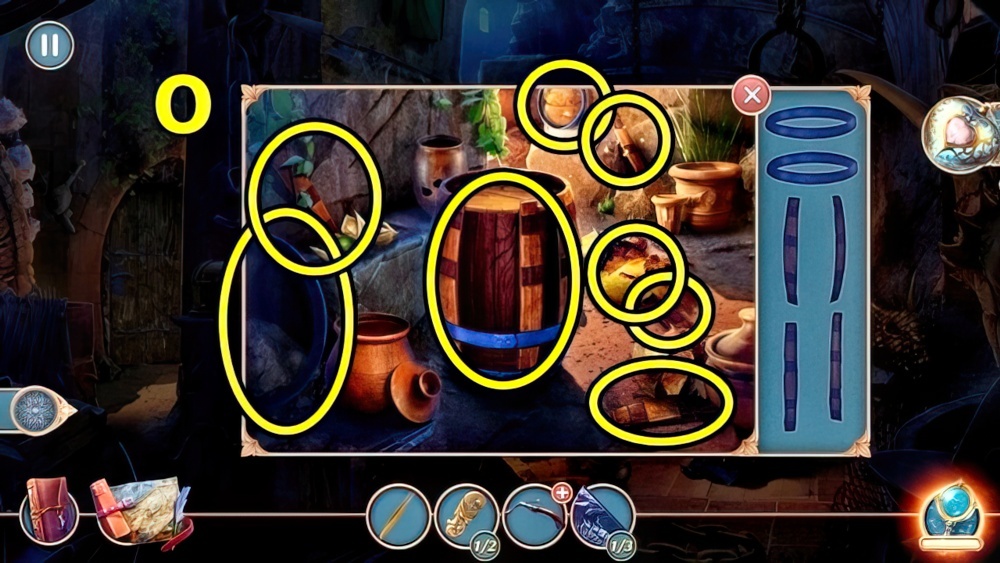
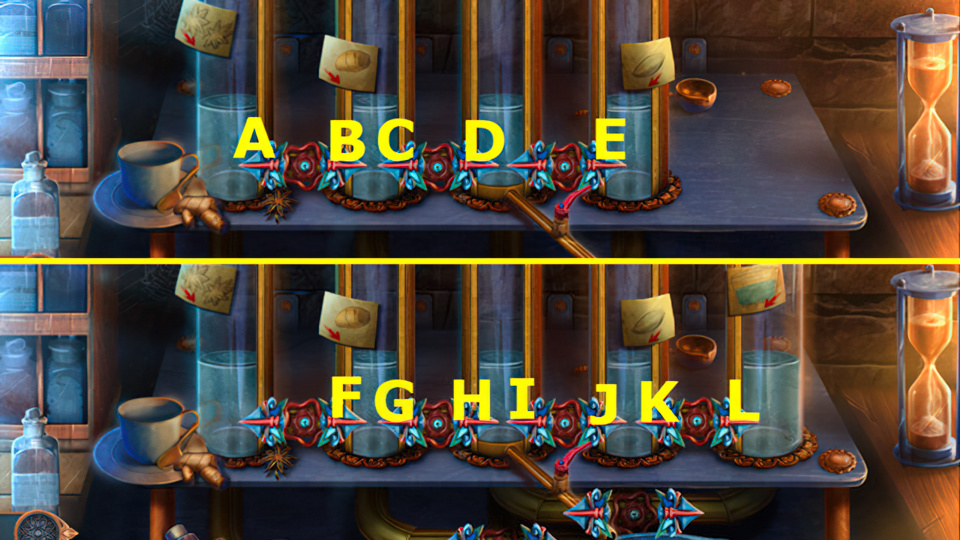
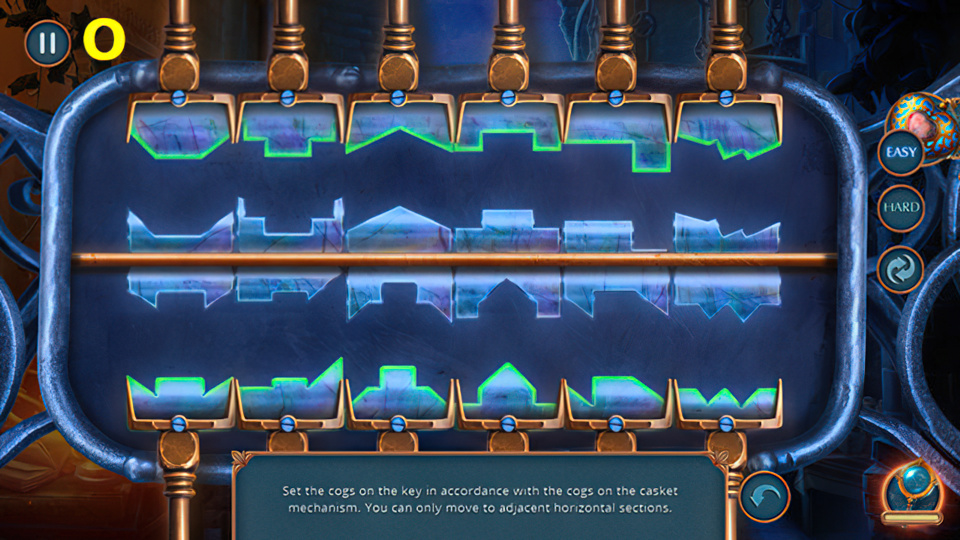
- Solution: (O) Easy: A-(Gx2)-H, B-G-I, C-(Gx3)-J, D-(Fx2)-K, E-(Fx2)-L.
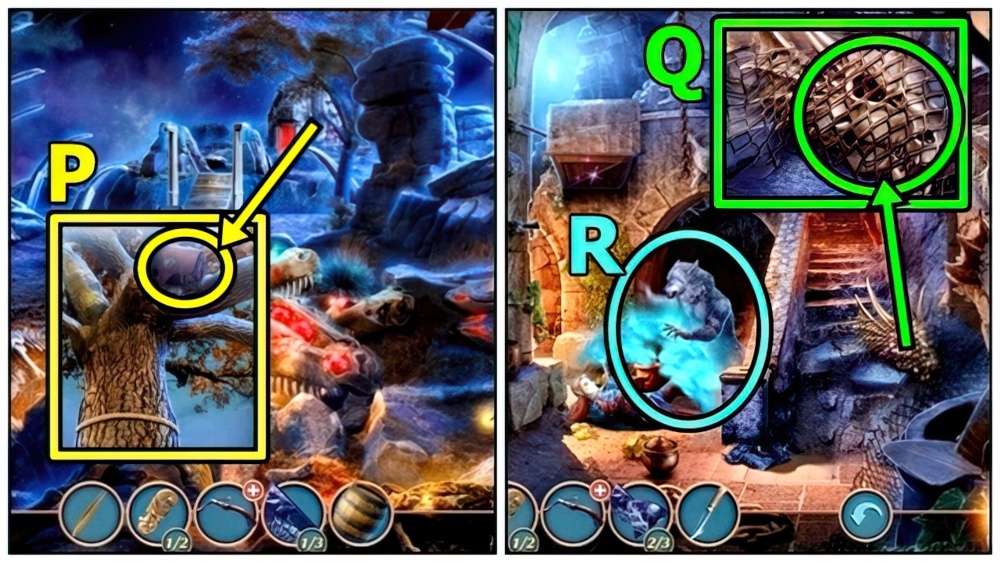
- Solution: (P) Easy: A-(Fx3)-G, B-(Ex3)-H, C-(Ex2)-I, D-(Fx2)-J.
- Solution: (Q) Easy: A-(Gx4)-H, B-(Gx3)-I, C-F-J, D-(Gx2)-K, E-(Fx2)-L.
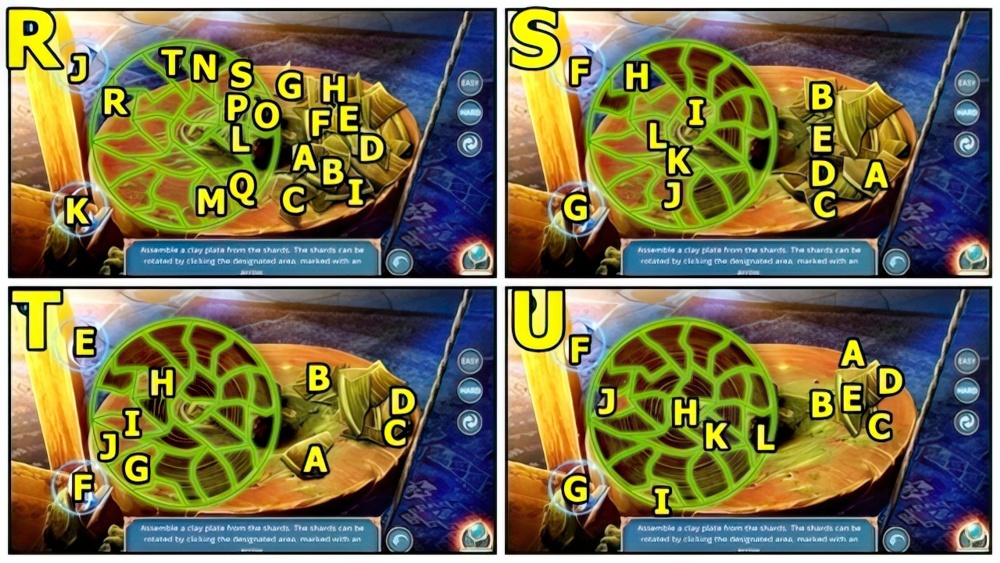
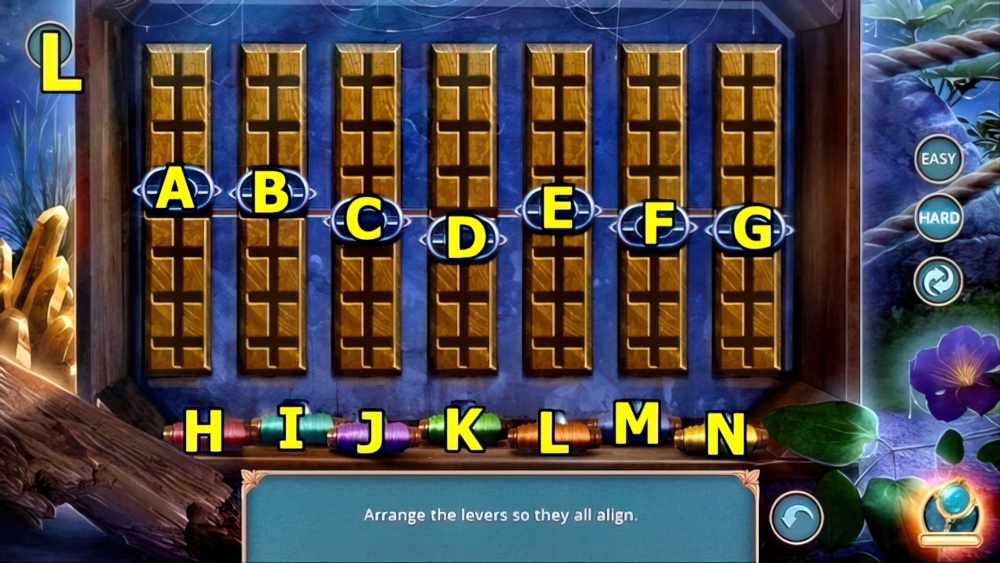
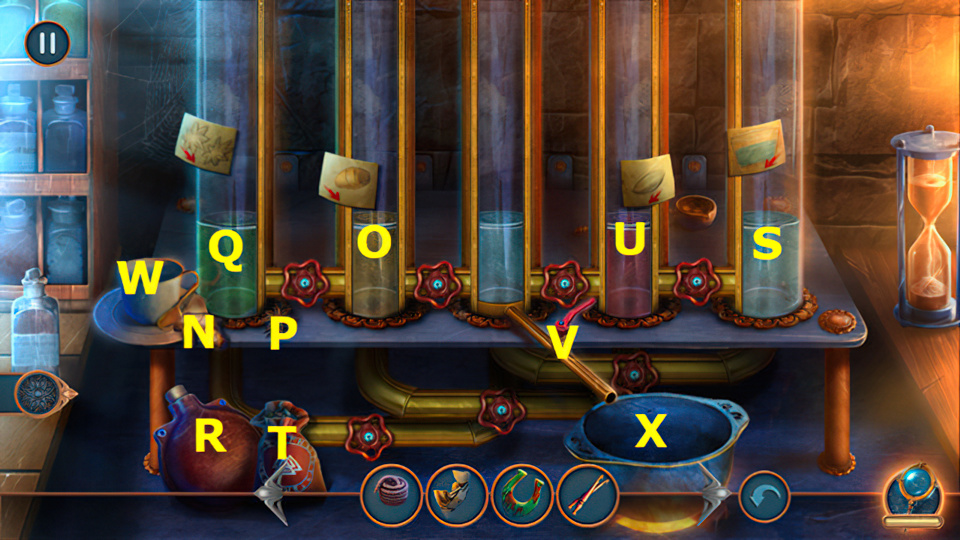
- Solution: (R) Hard: A-(Kx3)-L, B-K-M, C-(Jx2)-N, D-(Kx2)-O, E-(Kx2)-P, F-K-Q, G-(Jx2)-R, H-(Jx2)-S, I-(Jx2)-T.
- Solution: (S) Hard: A-(Fx3)-H, B-(Gx3)-I, C-(Gx2)-J, D-(Fx2)-K, E-(Gx4)-L.
- Solution: (T) Hard: A-(Fx2)-G, B-(Ex4)-H, C-(Fx3)-I, D-E-J.
- Solution: (U) Hard: A-(Gx3)-H, B-(Gx2)-I, C-(Fx2)-J, D-(Gx4)-K, E-(Gx3)-L.
- Receive CLAY PLATE.
- Return to Forest Depths.

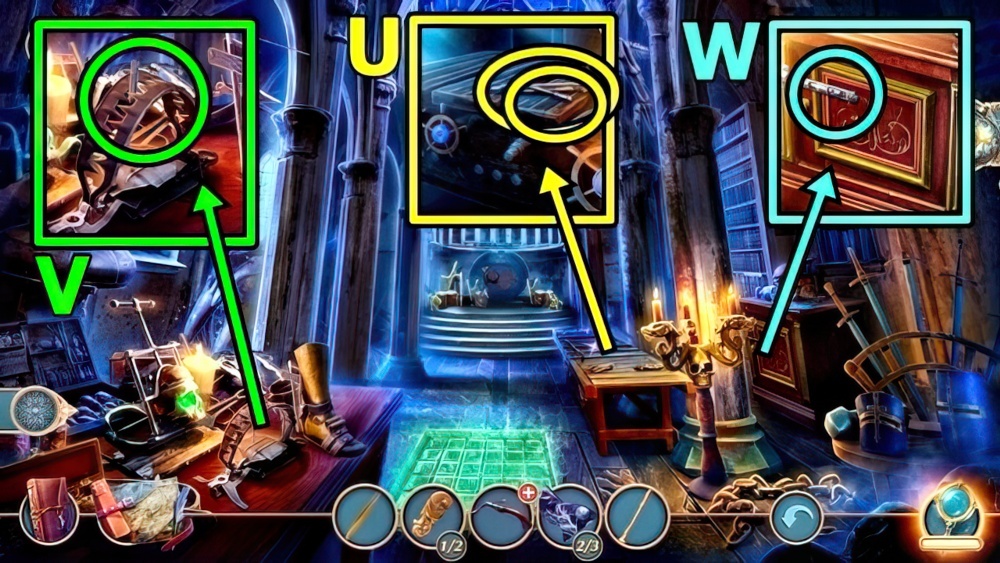
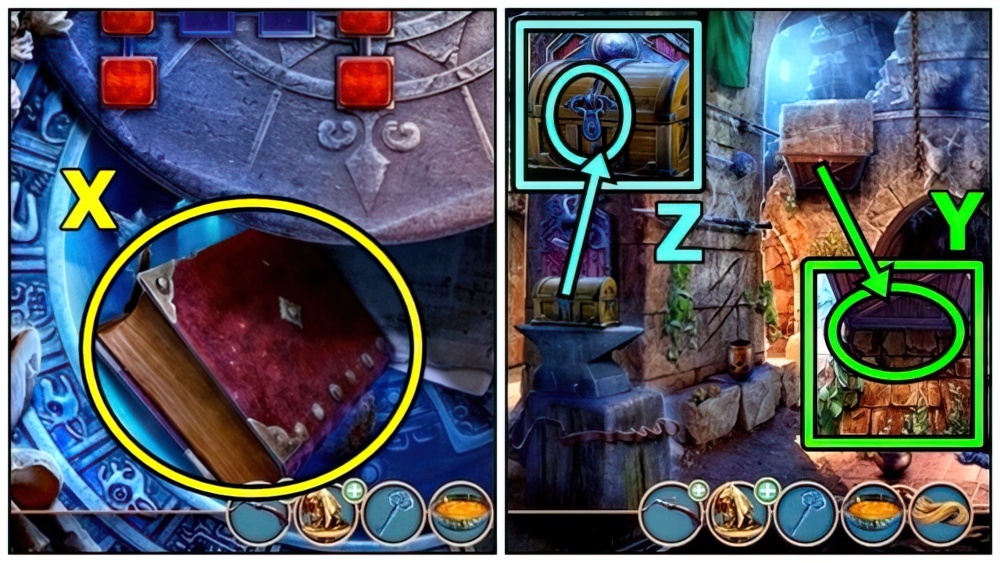
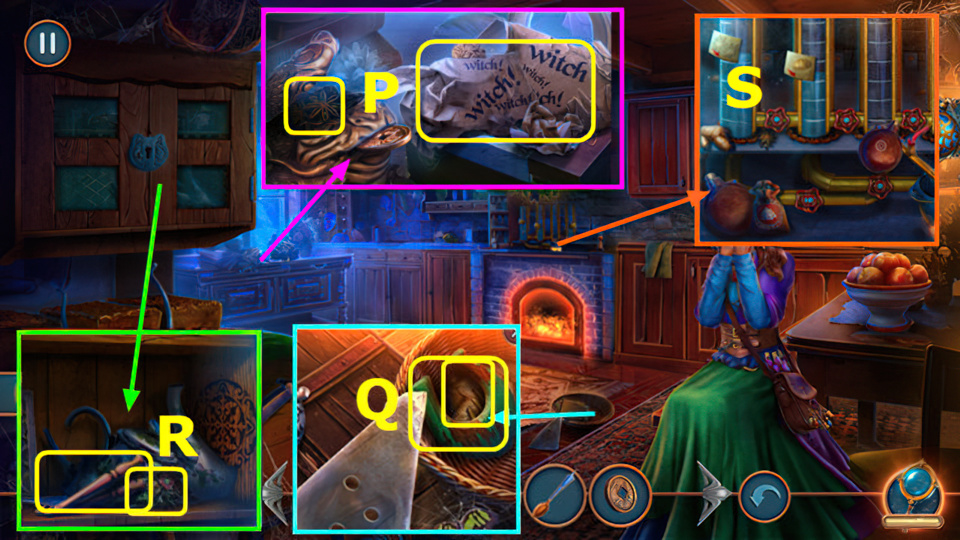
- Take FLINT (V) and OIL COLLECTION TUBE. Use CLAY PLATE, receive MUSHROOMS.
- Move down.
- Examine (W). Offer MUSHROOMS, take FLINT and EAGLE AMULET 2/2.
- Move down.

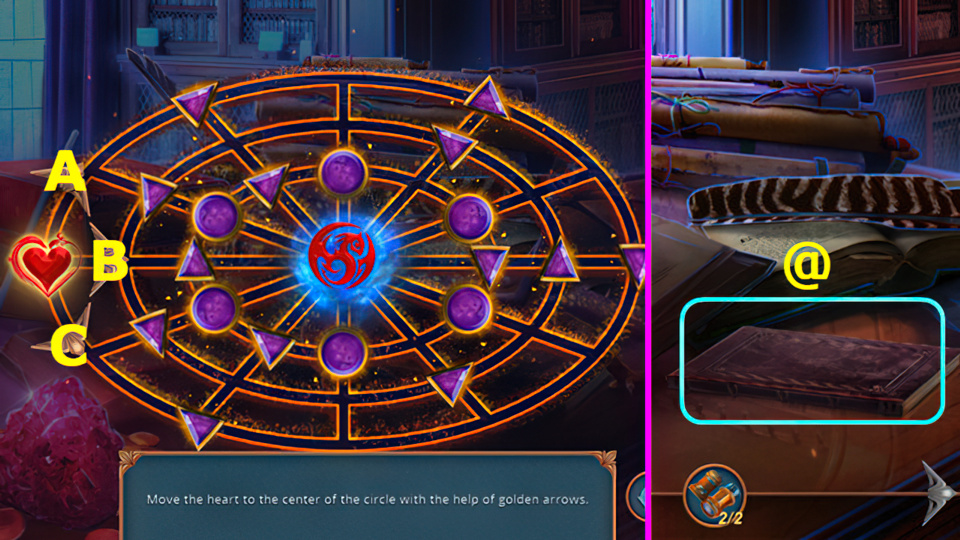
- Add EAGLE AMULET (X).

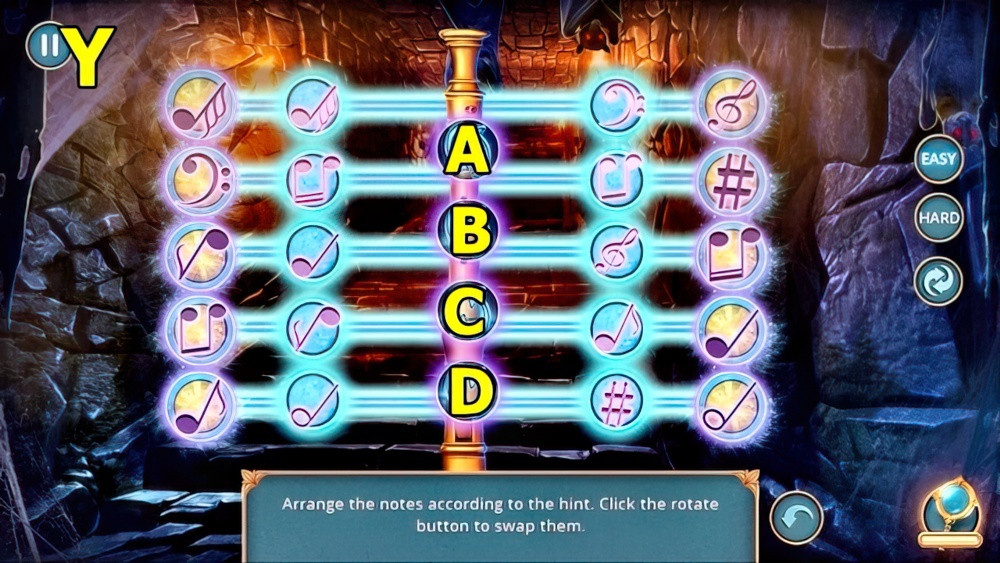
- Solution: (Y) Easy (A-D)-(C-E)-(A-C)-(B-E).
- Solution: (Z) Hard (C-E)-(A-F)-(A-H)-(F-D)-(I-E)-(B-G)-(G-E)-(I-B)-(H-A)-(A-C)-(E-I)-(C-E)-(A-C)-(H-A)-(A-F)-(A-C)-(I-E).
- Take SCARF (A).
- Use SCARF (B), take CHISEL.
- Move forward.
- Use HAMMER (C) and CHISEL, take AROMATIC STICK and LITTLE RAKE.
- Move forward.
- Use LITTLE RAKE (D). Play puzzle, take SADDLE.
- Add SADDLE (E).
- Answer (F).
- Take FRAME PART 1/2 (G).

- Examine (H), add OIL COLLECTION TUBE. Receive OIL.
- Use OIL (I), receive LEVER.
- Insert LEVER (J).
- Solution: (K) Easy: (I-A)-(F-B)-(J-C)-(H-D)-(G-E).
- Solution: (L) Hard: (M-A)-(K-B)-(L-C)-(I-D)-(N-E)-(H-F)-(J-G).
- Move forward.
- FLINTS on AROMATIC STICK, receive BURNING AROMA STICK.
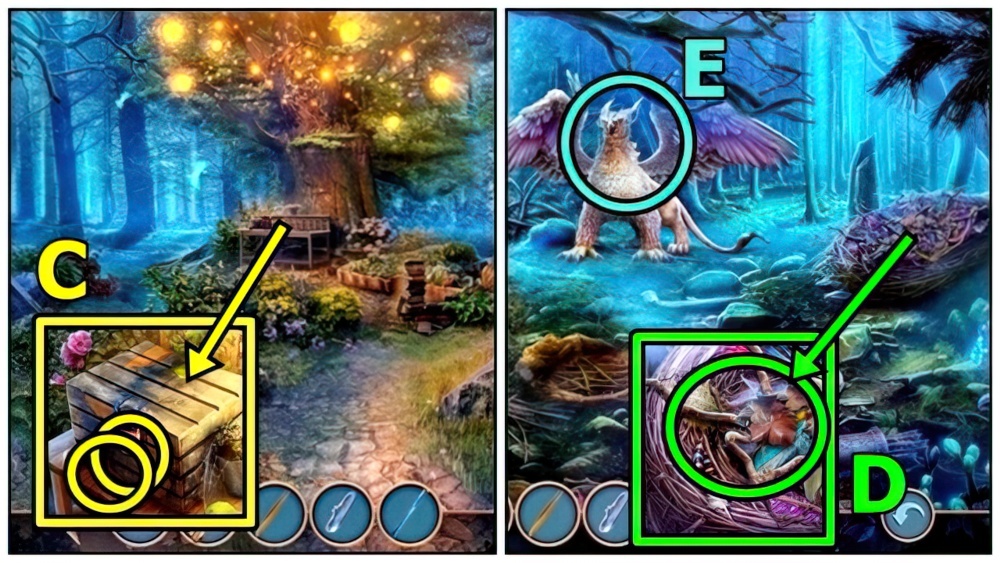
- Use BURNING AROMA STICK (M). Read, take BARREL LID, CROSSBOW and RELIEF PART 1/3.
- Add BARREL LID (N).
- Find items (O), take BIG BARREL.
- Move down.
- Add BIG BARREL (P), take BAG.
- Move forward.
- Open BAG, take HUNTING KNIFE and RELIEF PART 2/3.
- Use HUNTING KNIFE (Q), receive NET.
- Use NET (R).
- Answer (S).
- Take FLUTE (T).
- Enter Dragon Eros’s Dungeon.
- Take WOODEN HANDLES (U) and METAL CANE.
- Use METAL CANE (V), take RAMROD.
- Use RAMROD (W), take SHARPENED FLAT BONE.
- Move down.

- Use FLUTE (X).
- Solution: (Y) Easy and Hard: (Ax2)-(Bx3)-(Ax3)-B-(Ax2)-(Bx3)-(Cx3)-(Bx2)-(Cx2)-(Dx3)-C.
- Enter Ancient Tunnel.

- Take FRAME PART 2/2 (Z).
- Add FRAME PART (A). Play puzzle, take HELMET.
- Add HELMET (B), receive SHIELD.
- Return to Before Dragons’ Dungeon.
- Use SHIELD (C), take HEART-SHAPED AMULET. Use SHARPENED FLAT BONE, take CORE.
- Return to Dragon Eros’s Dungeon.

- Take RACK WHEEL (D).
- WOODEN HANDLES and CORE on RACK WHEEL.
- Add RACK WHEEL (E).

- Solution: (F) Easy: Ax2-Bx3-Cx3-Dx4.
- Solution: (F) Hard: C-D-Ax2-Bx2.
- Take WRENCH (G).
- Return to Ancient Tunnel.
- Add HEART-SHAPED AMULET (H), take RELIEF PART 3/3 and DRAGON STATUETTE PARTS. Use WRENCH, receive SHIELD.
- Add RELIEF PARTS (I).

- Solution: (J) Easy: D-Bx2-Dx2-B.
- Solution: (K) Hard: Dx2-Ax4-C-B-D-Bx2-Dx3-Bx2-D-A-C-B.
- Enter Ritual Hall.
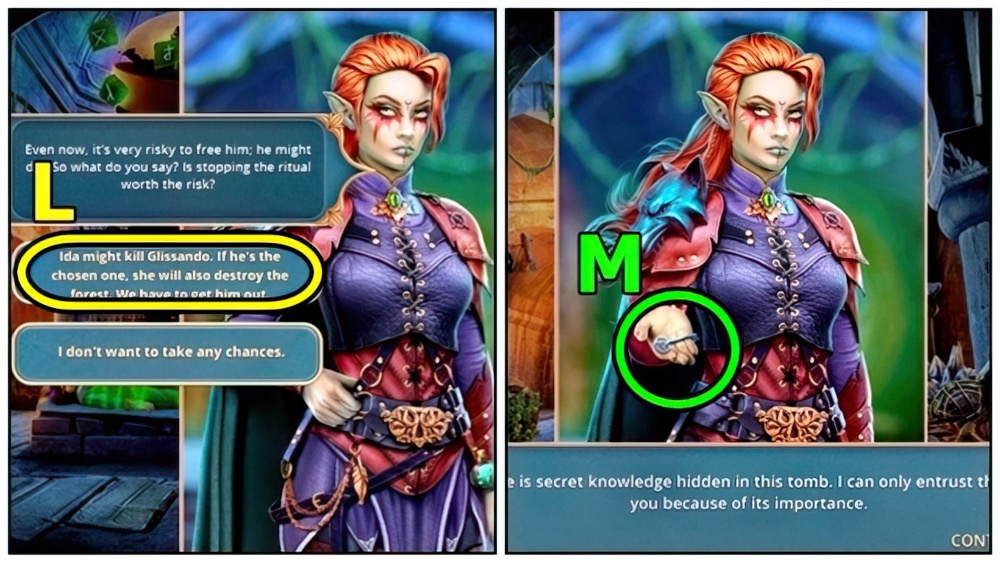
- Answer (L).
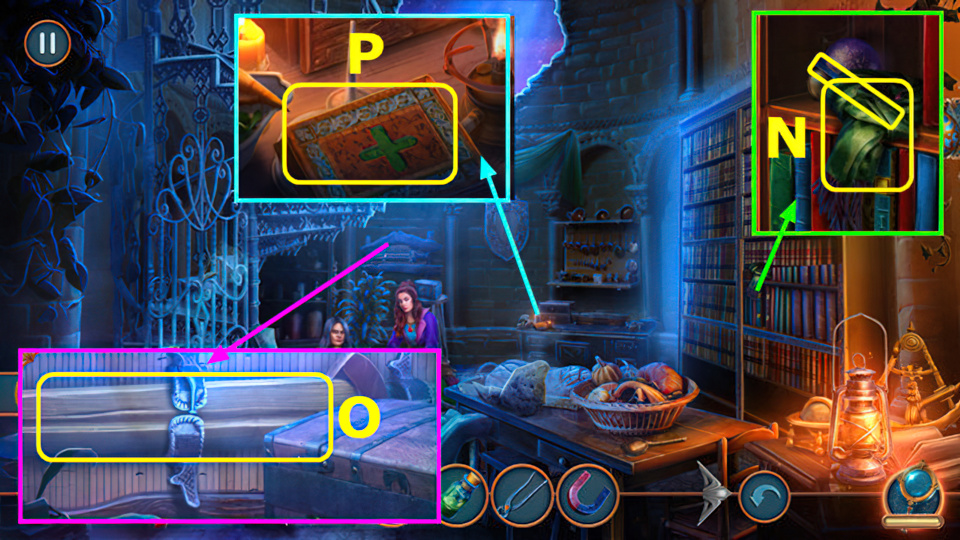
- Take BOOK KEY (M).

- Take RESIN BOWL (N). Use TWEEZERS, take DRAGON EMBLEM.
- Insert DRAGON EMBLEM (O), take TIP.
- Add TIP (P).

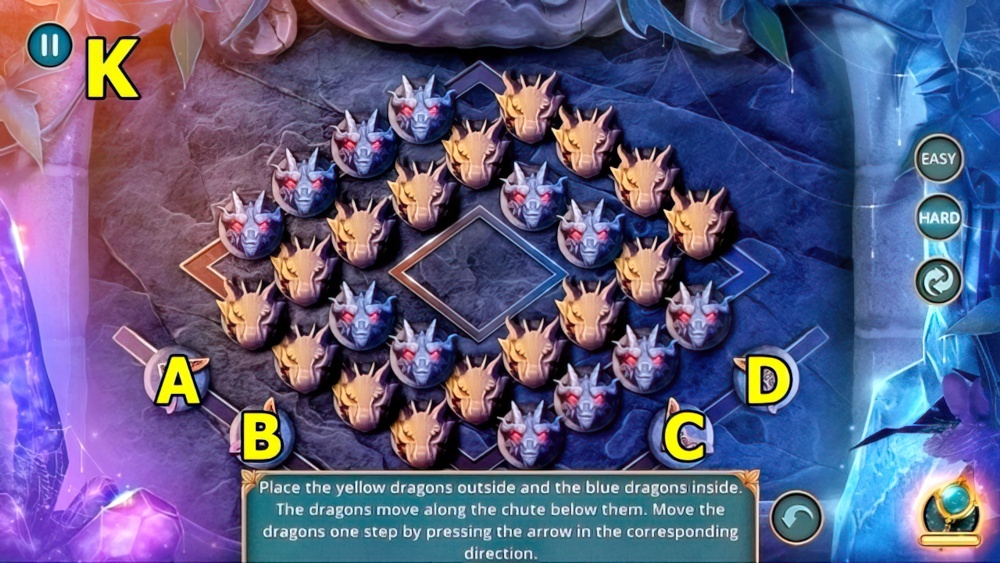
- Solution: (Q) Easy: D-A-D-A-C-A-C-A-D-A-C-B-A-D-C-B-D-A-C-B.
- Solution: (R) Hard: B-D-B-D-B-C-B-A-D-B-D-C-A-D-A-D-B-D-B-C-B-C-A-D
- Take ROPE (S).
- Return to Dragon Eros’s Dungeon.
- Use SHIELD (T), take DRAGON RUNE.
- Insert DRAGON RUNE (U).
- Solution: (V) Easy: (F-C)-(N-O)-(A-D)-(B-A)-(F-C)-(D-M)-(B-A)-(N-O)-(F-C)-(P-I)-(U-T)-(P-R)-(J-I)-(I-H)
- (Q-U)-(K-L)-(L-M)-(P-I)-(T-S)-(P-R)-(J-I)-(Q-U)-(K-L)-(U-W)-(K-L)-(L-M)-(M-N)
- (N-O)-(D-M)-(B-A)-(F-C)-(N-O)-(D-M)-(B-A)-(F-C)-(F-G).
- Solution: (W) Hard: (F-C)-(N-O)-(A-D)-(B-A)-(F-C)-(D-M)-(B-A)-(N-O)-(F-C)-(J-I)-(I-H)-(U-W)-(K-L)
- (L-M)-(P-I)-(M-N)-(P-I)-(T-S)-(P-R)-(J-I)-(I-H)-(T-U)-(L-M)-(P-R)-(J-I)-(R-V)-(J-I)
- (Q-L)-(L-M)-(P-I)-(M-N)-(P-I)-(S-R)-(R-V)-(J-I)-(I-H)-(Q-U)-(K-L)-(U-W)-(F-G)
- (A-D)-(B-A)-(K-L)-(L-M)-(M-N)-(N-O)-(F-C)-(N-O)-(D-M)-(B-A)-(F-C)-(N-O)
- (D-M)-(B-A)-(F-C)-(N-O)(D-M)-(B-A)-(F-C)-(M-L)-(L-K)-(D-M)-(K-J)-(D-M)-(E-D)-(F-O)-(F-G).
- Read (X).
- Move down.
- ROPE on CROSSBOW, receive CROSSBOW WITH A ROPE.
- Use CROSSBOW WITH A ROPE (Y), receive STAINED GLASS.
- Use BOOK KEY (Z). Play puzzle.
- Return to Ritual Hall.
- Remove (A), add STAINED GLASS. Play puzzle, examine, take FORBIDDEN MAGIC RING.
- Use FORBIDDEN MAGIC RING (B).
- Take BLADE (C).

- Use BLADE (D), take FILE.
- Use FILE (E), take RUBY.
- Move down.

- RESIN BOWL and RUBY on DRAGON STATUETTE PARTS, receive DRAGON STATUETTE.
- Add DRAGON STATUETTE (F), read, take MAGIC-ABSORBING STAFF.
- Enter Ritual Hall.
- Use MAGIC-ABSORBING STAFF (G), examine.

- Solution: (H) Easy and Hard: Solution is random.
Congratulations! You have completed the game Royal Romances Episode 9: The Dragon Legacy.
Источник
Royal Romances Episode 4: Curse of Runswick – Walkthrough
Royal Romances Episode 4: Curse of Runswick – The walkthrough of the game begins a year before the main events of the previous episodes, a magical mail bird brings you a message asking for help from the head of Ichon. For a long time, his lands suffer from some kind of infection that takes the lives of the inhabitants, and turns the fertile lands into a wasteland and poisons the water in the rivers. The inhabitants think that this is the result of the dark witchcraft energy accumulated in these lands. The inhabitants of these lands are unfolding a real hunt for all magical creatures, and which you must help. If you can’t complete any of the puzzles or don’t know where the items are, you can watch the Royal Romance 4: Runeswick’s Curse walkthrough on our website to stop this madness and uncover the true cause of the spread of corruption.
Royal Romances Episode 4: Curse of Runswick – Walkthrough
Here you can watch the full walkthrough of the game Royal Romances Episode 4: Curse of Runswick, namely the main plot.
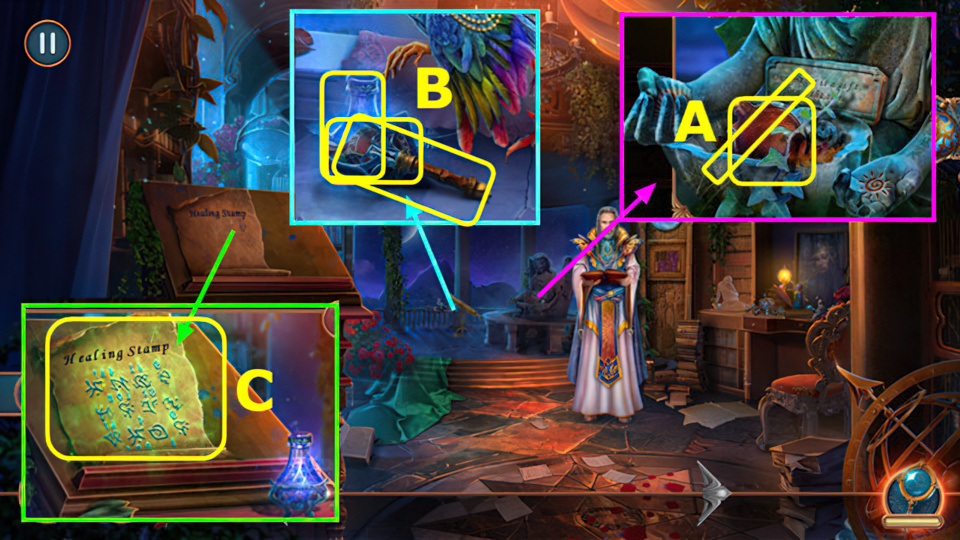
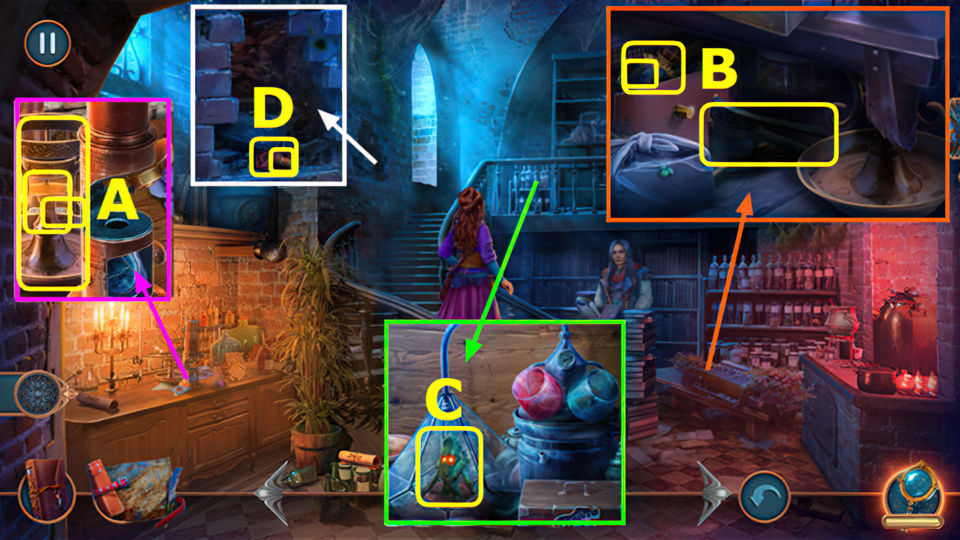
- Take FLASK OF WATER and BRUSH (A).
- Read note, take PRIESTESS’ STAFF, BAG OF RUNESTONES, and ENCHANTED INK (B).
- Use BRUSH and ENCHANTED INK, take HEALING STAMP SCROLL (C).
- Use HEALING STAMP SCROLL, take HANDKERCHIEF (D).
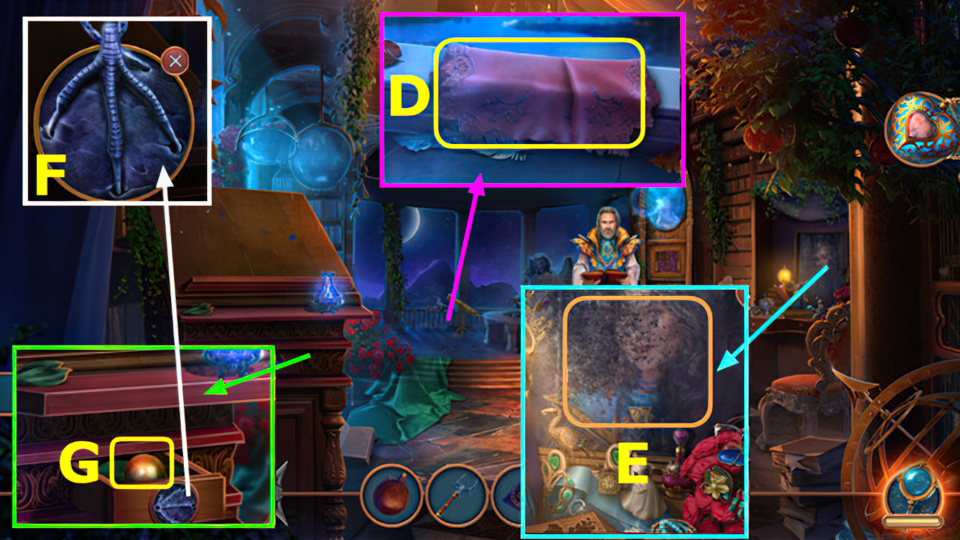
- Use HANDKERCHIEF (E), play puzzle, earn LUCKY CHARM.
- Use LUCKY CHARM (F), take SUN SPHERE (G).

- Place SUNSPHERE, take SHARP SEASHELL (H).
- SHARP SEASHELL on BAG OF RUNESTONES, earn RUNESTONES and BAG.
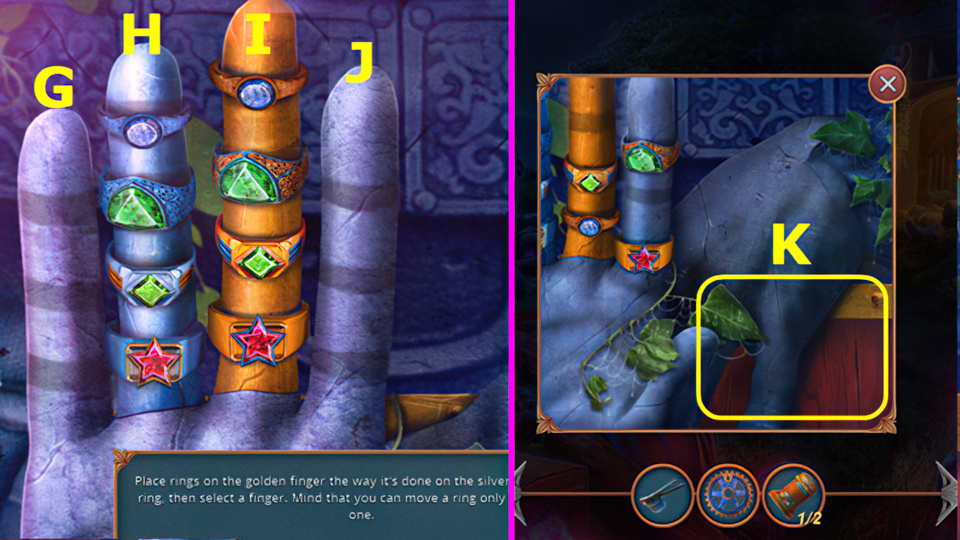
- Place RUNESTONES (I).
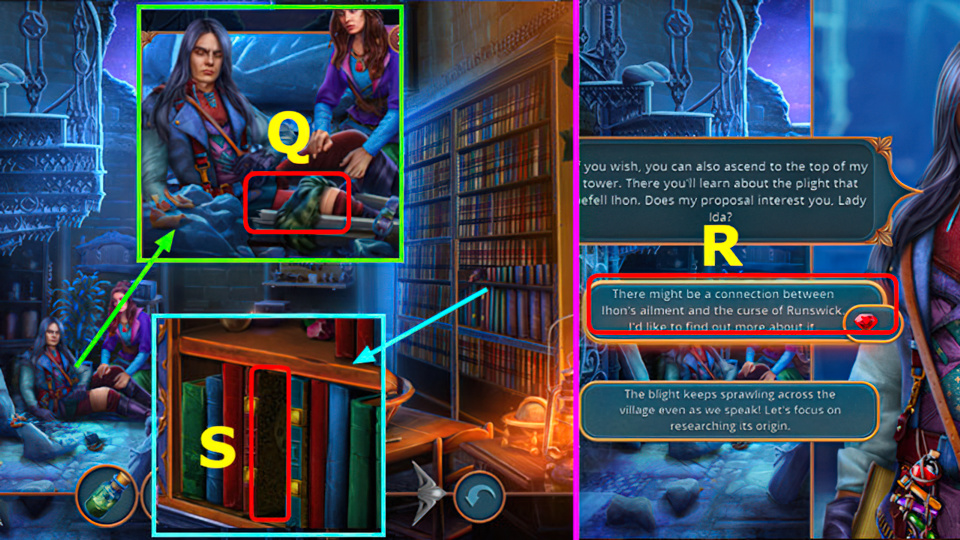
- East solution (J).
- Hard solution (K).
- Read note, take ROPE, use PRIESTESS’ STAFF, take COPPER SPOON and URSULA’S COMB (L).
- Use URSULA’S COMB, read note, take COIN and TUB (M).
- Use TUB (N).
- Select (O).
- Go left.
- Use COIN, take HEALING SPICE and THREATENING NOTES (P).
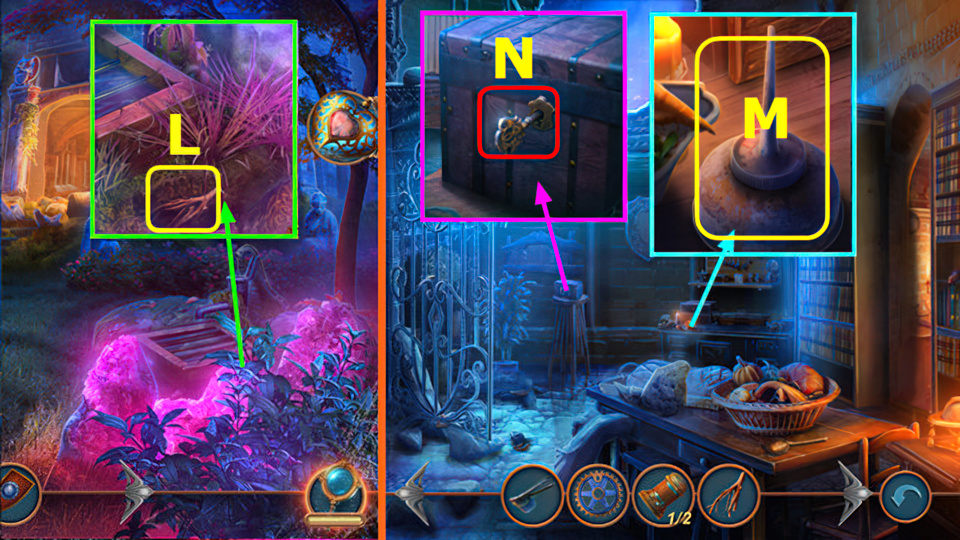
- Read note, take HORSESHOE and GINGER, move rug (Q).
- Use COPPER SPOON, take CROCHET HOOKS, use BAG, earn TEA LEAVES (R).
- Use HEALING SPICE, GINGER, TEA LEAVES, and FLASK OF WATER (S).
- Easy solution C-E-D-B-C-A.
- Hard solution G-I-G-K-I-G-K-I-H-J-L-J-F-H-J.
- Move (N-O)-(P-Q)-(R-S)-(T-U), select V.
- Move (W-X), earn CALMING TEA.
- Give CALMING TEA (A).
- Select (B), earn BASKET OF OATS.
- Walk down.
- Read book, use BASKET OF OATS (C).
- Go right.

- Take MALLET (D).
- Select BRANCHES, use CROCHET HOOKS, earn LETTER “I” INLAY (E).
- Select flowers, take BRUSH, use ROPE, take KNIFE, take 1/3 EVIDENCE (F).
- Use HORSESHOE and KNIFE, earn HORSESHOE WITH RESIN (G).
- Use HORSESHOE WITH RESIN, take LETTER “O” INLAY (H).
- Walk down.
- Place LETTER “I” INLAY and LETTER “O” INLAY (I), play puzzle, earn STUD EARRING.
- Use STUD EARRING, take DIAMOND RING (J).
- Go left.
- Use DIAMOND RING, earn HOLEY GLASS (K).
- Place HOLEY GLASS (L).
- Select 1-4 (M).
- Take OVEN FORK SHAFT, CORK, and TINDERBOX (N).
- Walk down, right.

- Move (O-P), add THREATENING LETTERS, use TINDERBOX.
- Take DIADEM and 2/3 EVIDENCE (Q).
- Walk down, left.
- Use DIADEM, take BELT, use BRUSH, take BOTTLE OF MAGIC SAND and HINT (R).
- Walk down, right.
- Use HINT (A).
- Easy solution (B).
- Hard solution (C).
- Take 3/3 EVIDENCE (D).
- Walk down, left.
- Give EVIDENCE (E).
- Select 1-3 to discuss evidence (F).

- Take UPPER PART and PINCERS (G).
- Place CORK and UPPER PART, take MAGNET and CHIP (H).
- Use CHIP, OVEN FORK SHAFT, and MALLET, take PICKAXE (I).
- Use PICKAXE, take ROPE (J).
- Use ROPE (K).
- Go forward.
- Talk (L).
- Select (M).
- Take SCARF and NAIL FILE (N).
- Use PINCERS, earn WOODEN SWORD (O).
- Take FIRST AID GUIDEBOOK (P).
- Open FIRST AID GUIDEBOOK, add SCARF, WOODEN SWORD, and BELT, earn SPLINT.
- Use SPLINT (Q), play puzzle.
- Select (R), earn ENCYCLOPEDIA OF POTIONS.
- Place ENCYCLOPEDIA OF POTIONS (S).
- Go right.
- Take POTION HOLDER, RING BASE, and 1/2 GROWING REAGENT (A).
- Use POTION HOLDER, take PRESSER, use MAGNET, take COG and 2/2 GROWING REAGENT (B).
- Use GROWING REAGENT and BOTTLE OF MAGIC SAND, take BABY DENDRONT (C).
- Use BABY DENDRONT, take 1/2 MICROSCOPE LENS and HANDKERCHIEF (D).
- Walk down 2x.

- Use HANDKERCHIEF, take GEMSTONE (E).
- NAIL FILE and GEMSTONE on RING BASE, earn ELEON’S RING.
- Place ELEON’S RING (F).
- Easy solution (I-J)-(G-I)-(J-I)-(J-I)-(G-I).
- Hard solution (G-J)-(H-G)-(H-G)-(I-H)-(I-H).
- (J-I)-(H-I)-(G-J)-(H-I)-(J-H)-(J-H)-(J-I)-(G-I).
- Take SHIELD (K).
- Use SHIELD, take ROOT (L).
- Go forward.
- Use PRESSER and ROOT, take ROOT OIL (M).
- Use ROOT OIL (N).
- Solution (O).

- Take WEAVING SCISSORS, place COG, take WING NUT (A).
- Go right.
- Use WEAVING SCISSORS, take WOODEN MUG (B).
- Walk down 2x.

- Use WOODEN MUG, take NUT (C).
- Go forward.
- Use WING NUT and NUT, take 2/2 MICROSCOPE LENS (D).
- Go left.
- Take 1/2 PIN (E).
- Take BUTTON (F).
- Use BUTTON, earn 2/2 PIN (G).
- Use PIN, take SCRAPPER (H).
- Walk down 2x.
- Use SCRAPPER, take CORKSCREW (I).
- Use CORKSCREW, select, take THREADS (J).
- Go forward, left.
- Use THREADS, play puzzle, earn DOORMAT (K).

- Use DOORMAT, take DRAGON AMULET (L).
- Walk down, right.
- Use DRAGON AMULET, take BOOK ON TAMING DRAGONS (M).
- Walk down, left.
- Use BOOK ON TAMING DRAGONS (N).
- Easy solution A-B-C-A-A.
- Hard solution A-A-A-B-C-B-B.
- Read journal (@).
- Walk down, right.

- Place MICROSCOPE LENSES (D), play puzzle, earn BLIGHT NOTES.
- Give BLIGHT NOTES (E).
- Select (F).
- Easy solution-drag center flower (G).
- Left-up-left-down-right-right-right.
- Up-up-down-down-down-right-down-up.
- Left-left-left-left-right-right-up.
- Hard solution-drag center flower (H).
- Left-up-left-down-right-right-right.
- Up-up-down-left-left-left-up-right.
- Right-right-down-down-down-right.
- Down-left-left-up-left-left-right-right-up.
Congratulations! You have completed the game Royal Romances Episode 4: Curse of Runswick.
Источник